2020-10 upd: we reached the first fundraising goal and rented a server in Hetzner for development! Thank you for donating !
Attention! I apologize for the automatic translation of this text. You can improve it by sending me a more correct version of the text or fix html pages via GITHUB repository.
CBSD API module
MyB: MyBee appliance
For those who do not like to configure the system we have prepared an independent FreeBSD distribution with pre-installed CBSD and API service - you can start working with virtual environments immediately after installing this distribution on bare metal. Please meet: MyBee.
Intro
CBSD allows the user to create environments at different levels of abstraction by providing a large number of methods for creating environments - CBSDfile, [jb]create commands, which work both in the configuration file and through command line arguments. Finally, you can use interactive dialog menus ([jb]construct-tui). Despite the variety, all of these options require the login to the server each time via SSH to enter the respective commands. The RestAPI service adds another option for managing environments for you, eliminating the need to use ssh, where you interact with the CBSD framework via HTTP / RestAPI requests or through a thin client. Unlike other methods, this level of abstraction solves the following problems:
- Fully remote control: the client does not need to enter the server and even have an account on the server;
- Forget about physical servers in general - it does not matter how many physical servers in the cloud. Stop thinking about it. Work with one input point that will solve all the problems on the placement of the environment for you;
- Unified Interface - RestAPI (unlike CBSD) Many specialists know;
- Separation of environments on independent namespaces - you can setup a CBSD cluster and provide access to the API to your friends or colleagues, where no one will interfere with each other. Each user works only with their environments;
- Lack of collisions in container/VM names between namespaces - each user can create a container or VM named 'test' and this will not cause name conflict;
- Three (!) works with a cluster/API method are officially supported: platform-dependent - CBSDFile (requires CBSD as a subtle client) and two independent: nubectl (client available on all modern platforms: Linux, Windows, MacOS) and any curl-like HTTP client with JSON as a payload;
- Maximum simplicity: You are adjusting only three parameters to get a fully working environment within a few seconds;
- Extensibility: Custom recommendations for host selection (for example - DRS), integration with external services (for example - IPAM), extrases (external helpers);
The API service architecture supports working both on a single node (when the API service and the hypervisor are combined), and allows you to use any number of nodes as hypervisors. We'll start by setting up a stand-alone cluster, especially since when switching to a multi-node option, all of these steps are still required.
private FreeBSD multi-node bhyve/jail cloud via API demo:
The service API architecture supports single-site and multi-site coverage, giving you the ability to easily create a private, programmable cloud to run virtualized environments, taking CBSD to a new level of environmental management. In addition to the classic request over HTTP (for example, through the curl utility), the API is supported by a CBSDfile, which in some cases gives a very powerful and more convenient deployment of services in a private cloud. But more on that below.
Let's fix the terminology that will be used in this article.
- CBSD - a set of scripts that implement virtual machine management at the lowest level. You need CBSD at least 13.0.1. If the version is lower, please upgrade before you start.
- ZPOOL - ZFS pool in which the CBSD working environment is initialized. By default, the CBSD working directory is initialized to /usr/jails.
- Broker - the main communication data bus between the cbsd-mq-api service (one) and cbsd-mq-router (can be in any quantity). In this article, beanstalkd serves as the broker.
- Tube Tube (in beanstald terminology) - a FIFO queue/pipe in the broker, to which cbsd-mq-api writes (publish), and cbsd-mq-router reads (subscribe).
- Hypervisor (or hoster) (not to be confused with bhyve hypervisor) - a physical node running FreeBSD OS. The number of nodes is unlimited. Each hypervisor has at least 1 ZPOOL. Each pool is served by a cbsd-mq-router process that subscribes to a personal pool queue to process CBSD instructions.
- API - service (public) that provides RestAPI or json-rpc for interaction between end users (curl / UI frontend). In our case, the simplest implementation will be the cbsd-mq-api service.
Let's start by looking at the simplest single-mode installation.
Standalone API
Installing and configuring the CBSD API in standalone mode.
In this example, all operations are performed on one hypervisor, which will act simultaneously as an API and a broker and a CBSD hoster, where working environments will be launched.
Assuming you have a stock vanilla FreeBSD 13.0+ installation.
1) Install additional packages:
pkg install -y cbsd-mq-router cbsd-mq-api beanstalkd git
2) Configure beanstalkd, the broker service.
Since all services are on the same server, we will specify the address 127.0.0.1 for incoming connections and start the service:
sysrc beanstalkd_flags="-l 127.0.0.1 -p 11300"
service beanstalkd enable
service beanstalkd restart
3) Configure MQ router.
First, get hoster FQDN via `hostname` command. Let's say your host has a name: apitest.my.domain
Open /usr/local/etc/cbsd-mq-router.json in any favorite editor and set "tube" and "reply_tube_prefix" params ( cbsd_<hostname_without_dot> and cbsd_<hostname_without_dot>_result_id ), e.g:
{
    "cbsdenv": "/usr/jails",
    "cbsdcolor": false,
    "broker": "beanstalkd",
    "logfile": "/dev/stdout",
    "beanstalkd": {
      "uri": "127.0.0.1:11300",
      "tube": "cbsd_apitest_my_domain",
      "reply_tube_prefix": "cbsd_cbsd_apitest_my_domain_result_id",
      "reconnect_timeout": 5,
      "reserve_timeout": 5,
      "publish_timeout": 5,
      "logdir": "/var/log/cbsdmq"
    }
}
4) Start MQ router:
service cbsd-mq-router enable
service cbsd-mq-router start
5) Install CBSD API module.
cbsd module mode=install api
echo 'api.d' >> ~cbsd/etc/modules.conf
cbsd initenv
6) Configure CBSD API module.
Copy configuration sample to work dir:
cp -a /usr/local/cbsd/modules/api.d/etc/api.conf ~cbsd/etc/
cp -a /usr/local/cbsd/modules/api.d/etc/bhyve-api.conf ~cbsd/etc/
cp -a /usr/local/cbsd/modules/api.d/etc/jail-api.conf ~cbsd/etc/
Open ~cbsd/etc/api.conf in any favorite editor and set "server_list=" to server FQDN, e.g:
...
server_list="apitest.my.domain"
...
Set 'cbsd' user permission for ~cbsd/etc/api.conf file:
chown cbsd:cbsd ~cbsd/etc/api.conf
Here you can check that the API module scripts works:
su -m cbsd -c '/usr/local/cbsd/modules/api.d/misc/recomendation.sh'
must return the host from server_list ( apitest.my.domain )
su -m cbsd -c '/usr/local/cbsd/modules/api.d/misc/freejname.sh'
must return the unique name 'envX'.
7) Configure RestAPI daemon:
mkdir -p /var/db/cbsd-api /usr/jails/var/db/api/map
chown -R cbsd:cbsd /var/db/cbsd-api /usr/jails/var/db/api/map
service cbsd-mq-api enable
service cbsd-mq-api start
Your first standalone private API cluster of VM is ready to serve you!
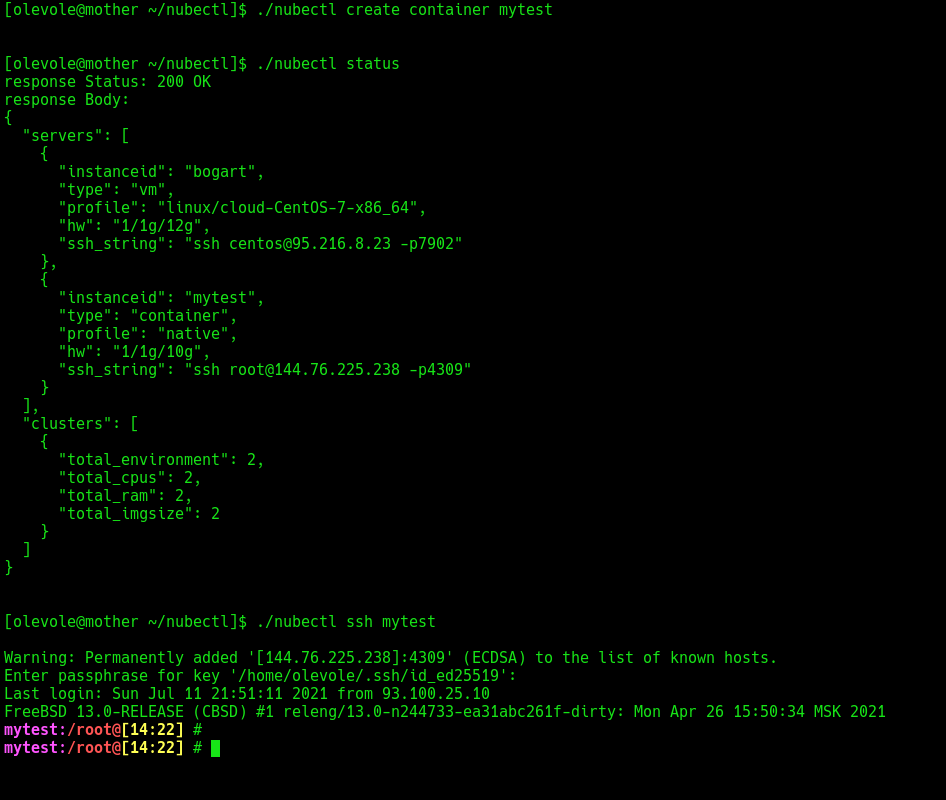
create jail with curl
Let's create a simple minimal payload to create a container, for example, a jail1.json file:
{
  "type": "jail",
  "imgsize": "10g",
  "pubkey": "ssh-ed25519 AAAA..XXX your@localhost"
}
Of course, substituting your public key as pubkey. Let's send it to the endpoint for container creation, where /jail1 at the end means the name of the environment (arbitrary)
curl -X POST -H "Content-Type: application/json" -d @jail1.json http://127.0.0.1:65531/api/v1/create/jail1
In this case, the API will calculate the MD5 hash from your pubkey and the result will automatically become your token, which you can use to control environments and at the same time will be a kind of namespace in the cluster. In it you will see all the resources created with the use of your public key.
Of course, such a mechanism (pubkey-based token) is only suitable for a private cloud. If you plan to raise a service for external users with a similar scheme, use more stringent validation methods to confirm dangerous operations, for example TOTP.
Please note that the first container can be created not quickly if you have not created a container on the host before: the CBSD will download and unpack the base.txz archive for jail base. So make sure the server has an Internet access to receive files from ftp/http.freebsd.org. Either, before the first query, simply 'warm up' system by creating a container via cbsd jcreate/jconstruct-tui.
Now, knowing the token, you can get the status of your container. Among this information will be a line for connecting through SSH to access the container. Get the MD5 sum of your key if you still don't know it ;-)
md5 -qs "ssh-ed25519 AAAA..XXX your@localhost"
Use it in request:
curl -H "cid:90af7aa8bc164240521753a105df6a05" http://127.0.0.1:65531/api/v1/status/jail1So, if you need to destroy the environment, use a GET request for the /destroy endpoint:
curl -H "cid:90af7aa8bc164240521753a105df6a05" http://127.0.0.1:65531/api/v1/destroy/jail1
Other parameters in payload, which can be useful when creating a container:
| "host_hostname": | specify hostname for your container, for example: "foo.example.com" |
| "ram": | restrict jail memory consumption through RACCT, for example:: "1g" |
| "cpus": | limit the number of cores for jail, for example: "2" |
| "pkglist": | list of packages for installation, for example: "misc/mc fping" |
| "extras": | extras (see below) |
| "recomendation": | enter your own recommendation on where to place the container. Instead of automatic selection. For multi-node clusters. For example: "host23.my.domain" (provided that the host23.my.domain host exists) |
create bhyve vm with curl
Working with virtual machines has a similar interface and endpoint, as in the case of jail, but has a slightly different payload for creating an environment.
Payload example, e.g. to create CentOS7 VM, centos7.json:
{
  "type": "bhyve",
  "imgsize": "10g",
  "ram": "1g",
  "cpus": "2",
  "img": "centos7",
  "pubkey": "ssh-ed25519 AAAA..XXX your@localhost"
}
And it is created by a similar request as jail:
curl -X POST -H "Content-Type: application/json" -d @centos7.json http://127.0.0.1:65531/api/v1/create/cent7
Other parameters in payload, which can be useful when creating a VM:
| "host_hostname": | specify hostname for your VM, for example: "foo.example.com" |
| "extras": | extras (see below) |
| "recomendation": | enter your own recommendation on where to place the VM. Instead of automatic selection. For multi-node clusters. For example: "host23.my.domain" (provided that the host23.my.domain host exists) |
Please note that, unlike classic bcreate/bconstruct-tui, the parameters vm_os_type and vm_os_profile here are consolidated to one "img" parameter for even greater simplicity. At the same time, mapping of <img> is set in the file that you have copied earlier, it is ~cbsd/etc/bhyve-api.conf. At the time of writing an article, affordable values as 'img': 'centos7', 'centos8', 'ubuntu', 'debian', 'freebsd_ufs', 'freebsd_zfs', 'openbsd', 'netbsd'.
Please note that the first VM of each image can be created not quickly if you have not created such profile on a host - CBSD will download and unpack the ISO - make sure that the server has an Internet access to receive files. Either, before the first query, simply 'warm up' the system, by creating-run-deleting all OS profiles with which you plan to work through the API.
CBSDfile + API
In some cases curl and RestAPI are much more convenient than ssh + `cbsd bcreate / bconstruct-tui`. If you have to deploy a lot of virtual environments and often, you cannot avoid the need to learn and use some high-level language. The above method CURL and HTTP requests are well suited if you develop a programmable cloud based on CBSD, but it's not very convenient for human. As an intermediate option, we can offer the option of interacting with the API through the CBSDfile.
The API-enabled CBSDfile gives you the ability to easily build a private programmable cloud to run virtual environments because you can fully describe in one file the finished a service (or several services) in a single virtual environment (or several virtual environments). A similar tool is the nubectl - thin client, which described below.
If you are not familiar with this CBSD feature, be sure to check it out. In order to use the CBSDfile in your private cloud, you just need to add only two parameters to the beginning of the CBSDfile - this is the Endpoint of your API and the key. Having these two options will cause CBSD to switch from a local CBSD installation to the cloud when building. And this can provide a completely new level of capabilities (an example of interaction with a multi-node cluster)!
Parameters such as ssh_wait, jscp and jexec (bscp and bexec for bhyve) should also work, which allows you not only to deploy a virtual environment in the cloud, but also to produce a number of operations in it when creating, an example of such a CBSDfile:
CLOUD_URL="http://127.0.0.1:65531"
CLOUD_KEY="ssh-ed25519 AAAA..XXX your@localhost"

jail_rabbitmq1()
{
        imgsize="30g"
        ssh_wait=1
        pkg_bootstrap=0
        host_hostname="rabbitmq1.my.domain"
}
postcreate_rmqbsd1()
{
        jscp prepare.sh ${jname}:prepare.sh
        jexec /root/prepare.sh
}
And put in the same directory with the CBSDfile executable 'prepare.sh' file, which will be copied and running in the created environment.
In addition to creating and deleting operations, the commands will work with API-enabled CBSDfile: cbsd login, cbsd status
nubectl
Finally, there is another option in the form of a thin client called nubectl, which is available for all modern OS. With it, you can create and delete environments, as well as log-in via ssh for unix-like guests, even if you work on Microsoft Windows.
In addition, nubectl supports the description of Infrastructure As a Code via yaml files. Refer to example cloud config.
Another sample with nubectl-windows:
nubectl-windows status --cloudkey="c:\authorized_keys" --cloudurl=http://127.0.0.1:65531
nubectl-windows create vm --cloudkey="c:\authorized_keys" --cloudurl=http://127.0.0.1:65531
nubectl-windows ssh vm --cloudkey="c:\authorized_keys" --cloudurl=http://127.0.0.1:65531 [--sshkey=c:\id_ed25519]
Multinode API
Multinode API/CBSD cluster
As stated earlier, the current architecture is capable of serving more than one hypervisor. That, with intensive deployment of virtual environments in large numbers, can significantly increase the efficiency and efficiency of your cloud resources.
Our simple API service has the ability to use two external scripts that implement logic for two actions:
- a) suggest the following free name for the virtual environment. Taking into account several nodes, this solves the problem of possible collisions of names, since it is regulated at one point.
- b) get recommendations on which host the requested virtual environment should be placed on.
Any flight of imagination is given here for the implementation of logic in any programming language convenient for you and the use of any algorithms. So, for example, if some of your servers have high-performance but low-volume NVME disks and some of your servers have capacious but slow hdd, you can easily implement a simple logic like:
> If a virtual machine with a disk capacity> 500GB is requested, select from the list of servers with hdd.
Together with the API module, two sh scripts are supplied, which, as examples, give a unique ID as a virtual machine name and a round-robin server issuing server. That should be enough to start a full-fledged multinode cluster in 10 minutes. Let's do that.
For simplicity and maximum freedom from dependencies, we will not use additional services or databases, we will manage with ordinary files and directory synchronization using the rsync protocol.
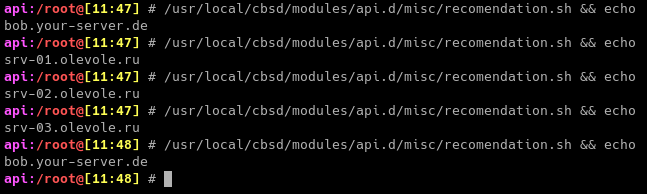
Let's start by setting up the service API. In relation to the standalone configuration, in the ~cbsd/etc/api.conf file, we expand the list by the required number of members in the cluster, for example:
server_list="srv-01.olevole.ru srv-02.olevole.ru srv-03.olevole.ru bob.your-server.de"
You can check that the recommendation script (/usr/local/cbsd/modules/api.d/misc/recomendation.sh) offers hosts in round-robin by default:
 WIP...
API: advanced/custom configuration
With the configuration file, you can regulate some behaviors, such as working with IP addresses, redirects, IPv6 preferences, etc. By default, CBSD picks IP addresses from your nodeip4pool. The pool is assumed to point to private ( RFC-1918 ) addresses. In order for access to the inside of the environment to be available from the outside, CBSD automatically finds the first free port and creates a port redirect from the external IP address (nodeip4) inside the container. API return SSH connection string as ssh4_string : the external address (nodeip) and the new port.
If you use external addresses as a pool, or you have direct access ( IPSec / VXLAN / other tunnels ) to the host's private network, you can change the behavior by disabling the selection of a dynamic port and turning off redirection altogether. Then, the API will give as ssh[4,6]_string IP:22 of the virtual machine. This is the responsibility of the nodeip_expose=1 parameter in ~cbsd/etc/bhyve-api.conf and ~cbsd/etc/jail-api.conf (for bhyve and jail, respectively).
If you are using a cluster with several servers in different datacenters, which are united into one private network in which the environments are running, you may want to change the source of issuing addresses to an external service, as is done here.
If you want to perform some own custom operations when creating environments - use the ability called 'extras': this is a kind of tags or custom parameters for which you can map any of your operations.
For example, by using:
extras="dns:my.domain"
You can force the API register in the DNS service name: my.domain, which will indicate the created environment. Or you may want to use something like:
extras="lb:true"
which when creating the environment configures VHOST on an external balancer (haproxy/nginx/..), indicating as an upstream for a virtual host IP address of the created environment.
extras can be combined: such as writing the form:
extras="dns:wordpress.my.domain,lb:true,ipv6:external,letsencrypt:true"
can force the API when creating an environment to register wordpress.my.domain in the DNS, create the LetsEncrypt SSL certificate via certbot, add external IPv6 address as well and create and apply a configuration on a balancer.