2020-10 upd: we reached the first fundraising goal and rented a server in Hetzner for development! Thank you for donating !
Operation with bhyve virtual machine
Attention! Current pages describe CBSD version 13.0.x. If you are using an older version, please update first.
Attention! I apologize for the automatic translation of this text. You can improve it by sending me a more correct version of the text or fix html pages via GITHUB repository.
bhyve virtual machine create via dialog menu
Commands: bcreate, bconstruct-tui
                % cbsd bconstruct-tui
                % cbsd bcreate jconf=/path/to/conf.jconf
The virtual machine is created on a pre-formed configuration file through cbsd bcreate jconf=path_to_cfg.
For the configuration process, you can use the script cbsd bconstruct-tui, or use WEB interface.
To create a via DIALOG:
% cbsd bconstruct-tui
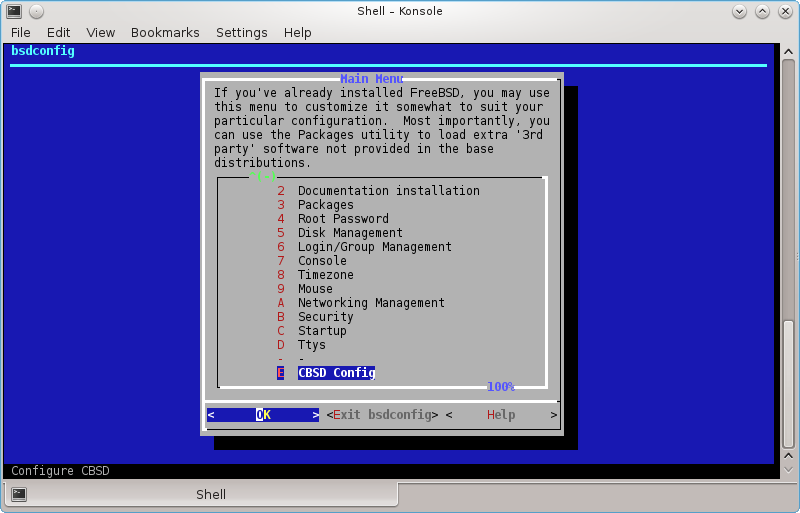
The same menu is available to create a jail when configuring CBSD via bsdconfig
If bconstruct-tui worked correctly, at the end you will be asked to create a virtual machine. In the case of positive response, bcreate will be made to the new configuration automatically. Otherwise, script displays the path to the configuration file (in $workdir/tmp), on which you can create a VM.
Virtual Machine Profiles
Profiles that come with CBSD and on which systems determine the URL from which the ISO image is downloaded, placed in the catalog ~workdir/etc/defaults/ and start with the prefix vm-
. For example, you can see the profiles list by command:
% ls -1 ~cbsd/etc/defaults | grep ^vm-
vm-dflybsd-x86-5.conf
vm-freebsd-FreeBSD-x64-11.1.conf
vm-freebsd-FreeBSD-x64-12.0-LATEST.conf
vm-freebsd-FreeNAS-x64-11.conf
vm-freebsd-pfSense-2-RELEASE-amd64.conf
vm-linux-CentOS-7.4-x86_64.conf
vm-linux-Debian-x86-9.conf
vm-linux-fedora-server-26-x86_64.conf
Since the CBSD releases come out much less often than the versions of the various distributions, these profiles may expire quickly enough, and as a result, the image becomes inaccessible by the old links.
In order not to get into similar situations and get new profiles, you can update them separately from CBSD with the Makefile in the ~workdir/etc directory. There are two commands in the Makefile (you will see them if you just write make in this directory):
- make profiles-create - is done once by starting the git repository from the GitHub: https://github.com/cbsd/cbsd-vmprofiles
- make profiles-update - is done every time (after profiles-create) when you want to update profiles
Since these operations are used by git, you must first install it in the system: pkg install devel/git (or from the ports: make -C /usr/ports/devel/git install)
For example:
% cd ~cbsd/etc
% make profiles-create
% make profiles-update
If you notice that some version of the profile is out of date and in the repository https://github.com/cbsd/cbsd-vmprofiles no one sent a correction, you can contribute CBSD by sending changes (in the old profile or creating a new one) independently through Pull Request, having an account on github.com
Creating your own virtual machine profiles
If your desired OS profile is missing from the CBSD distribution, or for some reason you are unsatisfied, you can create your profile by analogy with an existing one
Custom profiles must be located in the ~cbsd/etc directory (for example, /usr/jails/etc), while the original CBSD profiles are in directory ~cbsd/etc/defaults (for example, /usr/jails/etc/defaults)
If you edit files in the ~cbsd/etc/defaults directory, all your changes will be deleted each time you update CBSD
If you want to overwrite the original profile, just copy it to the ~cbsd/etc directory and edit it. In this case, with the same profile names, the system will always prefer the profile from the ~cbsd/etc directory, despite its presence in the ~cbsd/etc/defaults directory.
When creating a new profile, please observe the following rules:
- the file name must begin with vm-"os-type"-XXX.conf, where os-type - type of OS, e.g: freebsd, openbsd, linux, windows, other
- Inside the profile this arguments are mandatory: long_description, vm_profile и vm_os_type
- long_description contains an arbitrary description, for example: long_description="Linux Debian 9.2.1"
- vm_os_type - contains the OS type and must also be in the file name. So, if the OS type is linux, write: vm_os_type="linux", and the profile file will begin with vm-linux-
- vm_profile - the name of the profile, which also forms part of the profile file name. For example, if you created a profile for Debian 9.2.1, you can write vm_profile="Debian-9.2.1", and the full name of the profile file will be: vm-linux-Debian-9.2.1.conf
Where:
The remaining parameters are optional (as the number of cores, RAM, the default virtual machine name, various bhyve settings), and if they are not in the profile, common values will be used from etc/defaults/bhyve-default-default.conf, which you can also copy it to etc/bhyve-default-default.conf if the global parameters do not suit you and you want to edit them
Also, look at the fetch, iso_img, register_iso_name, and register_iso_as options.
If you create a virtual machine profile that you can retrieve over the network, you will most likely need them.
fetch says CBSD whether an ISO image is available for download (0-no, 1-yes)
iso_img points to the name of the ISO image, as it is called from the source where to download it (for example, ubuntu-17.04-server-amd64.iso)
The parameters register_iso_name and register_iso_as control how to save the image to be downloaded and under what name to register in CBSD media, for example:
register_iso_name="cbsd-iso-ubuntu-17.04-server-amd64.iso"
register_iso_as="iso-Ubuntu-Server-17.04"
If an ISO image is downloaded from the site, but an archive with an ISO image, for example .tgz or .gz or .xz etc. (for example, the vm-dflybsd - profile), you can specify the command to unzip, using the iso_extract parameter, for example:
iso_extract="bzip2 -d "
And of course, it's always useful to see how original images are written, the profile of which can be taken as a basis.
If you created a working OS profile, you can send it to the repository https://github.com/cbsd/cbsd-vmprofiles having an account on GitHub, thereby making other users CBSD happy. Also, this profile will be included in the next release of CBSD and you will become participant of the project!
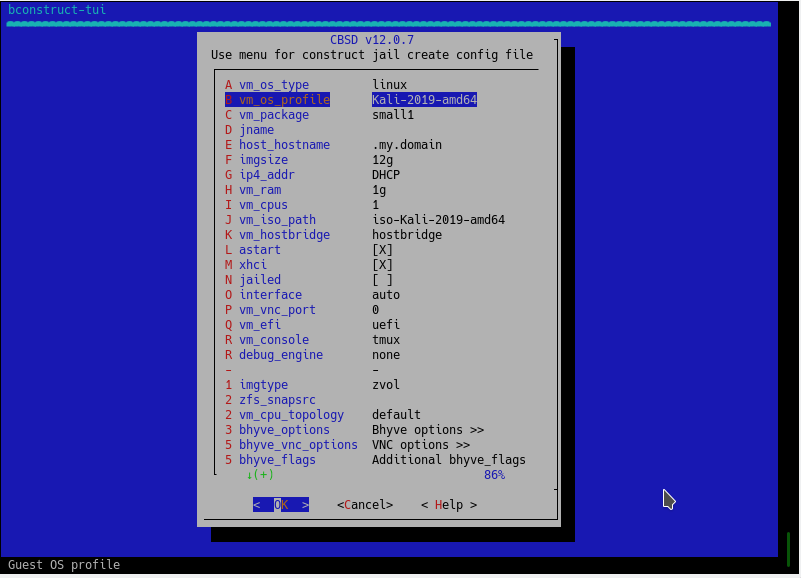
Options and their brief description, which appear in the dialogue form. Depending on the type and profile of the OS, some of them may not be available:
- vm_os_type - type of OS. Depending on the type of the guest OS will be offered a particular profile set distributions
- vm_os_profile - select the profile distribution. A profile can contain as proposed default parameters described below, as well as specific distro settings (URL for the image, kernel boot options, etc.)
- imgsize - Size for the first virtual image. If the guest OS - FreeBSD profile and FreeBSD-from-jail (image generation through jail2iso), this parameter indicates the amount of free space after copying distribution
- jname - the name of the virtual machine, in a one word.
- host_hostname - relevant only to the guest OS FreeBSD and Profile FreeBSD-from-jail: set the hostname in /etc/rc.conf guest OS to the appropriate value
- vm_ram - allocated RAM
- vm_cpus - the number of virtual cores
- vm_hostbridge - guest OS host bridge. Maybe hostbridge or amd_hostbridge (affects the PCI vendor ID)
- astart - sign automatically start the virtual machine with the boot node
- interface - uplink interface for tap-interface, the first network card of the virtual machine
- pkglist - relevant only to the guest OS FreeBSD and Profile FreeBSD-from-jail: select the appropriate pekedzhi to be pre-installed in the created VM
- ip4_addr - relevant only to the guest OS FreeBSD and Profile FreeBSD-from-jail: set the ifconfig_NIC /etc/rc.conf in the guest OS to the appropriate value - can be an IP address or a 'DHCP'
- gw4 - relevant only to the guest OS FreeBSD and Profile FreeBSD-from-jail: install defaultrouter parameter /etc/rc.conf guest OS to the appropriate value
- ver - relevant only to the guest OS FreeBSD and Profile FreeBSD-from-jail: use the base and kernel of the specified version (for example 10.1, 11.0, 12)
- applytpl - relevant only to the guest OS FreeBSD and Profile FreeBSD-from-jail: whether to apply additional settings (/etc/hosts, /etc/make.conf)
- floatresolv - relevant only to the guest OS FreeBSD and Profile FreeBSD-from-jail: set /etc/resolv.conf servers listed in the parameter jnameserver
- arch - relevant only to the guest OS FreeBSD and Profile FreeBSD-from-jail: use the base and kernel of this architecture (eg i386, amd64)
bhyve and cloud-init with CBSD
Commands: bconfig, bconstruct-tui, cloudinit
                        % cbsd bconstruct-tui
                        % cbsd cloudinit
                        % cbsd bcreate
Description:
FYI: Cloud-init demo was demonstrated in:
- Bhyve unattended installation with CBSD: PXE and cloud-init
- NetBSD cloud image for bhyve demo
- Microsoft Windows Server 2016 cloud image via CBSD/cloudbase demo
Currently, the use of cloud-init is a de facto method for rapidly deploying virtual instances in various cloud environments (OpenNebula, OpenStack, Amazon AWS, Microsoft Azure, Digital Ocean ..)
Starting from version 12.0.6 CBSD supports the configuration of cloud images using the cloud-init function.
How it works:
Currently, CBSD is able to configure the instans of cloud-init using the NoCloud data source method. This means that the virtual machine receives all the settings through the file system fat32/msdos_fs or cd9660 of the connected local media. The task of CBSD is to generate and connect the image to the virtual machine at the time of its launch.
As a sign that CBSD should activate cloud-init functions, is the fact that there is a cloud-init directory in the system directory of a individual virtual machine: ${jailsysdir}/${jname}/cloud-init/. In addition to the sign of activation of cloud-init, this directory acts as a repository of configuration in the format and hierarchy of cloud-init, which will be provided to the virtual machine. That is, if the CBSD working directory (cbsd_workdir) is initialized in the /usr/jails directory, for the virtual machine named vm1 the enable flag and parameters for configuring cloud-init should be in /usr/jails/jails-system/vm1/cloud-init directory.
For configuration format and configuration options for cloud-init, refer to the relevant official project information.
In addition, the CBSD distribution includes an example of a simple configuration that you can view in the /usr/local/cbsd/share/examples/cloud-init directory and use as a starting point for creating your own cloud installations.
Attention! Despite the lack of binding to ZFS, installation using ZFS is recommended for use with cloud-init. In this case, CBSD uses COW technology in the form of a zfs clone to create a virtual machine based on the cloud image. Otherwise, CBSD each time will be forced to perform a lengthy operation with a standard copy of the cloud image on the virtual machine disk. However, it is still much more efficient than installing via ISO using the installer every time.
Attention! In some cases, you may need a runtime configuration, for example, when using network-config version 1. Unlike version 2, where you can use the match parameter with wildcard as the network interface name, the first version requires a strong interface name. Which may vary depending on the numbering of the PCI bus. In this case, you may need the opportunity pre/post start/stop hooks in CBSD, which helps you create dynamic configurations for cloud-init.
In addition, an assistant for cloud-init was added to the CBSD virtual machines configurator via bconstruct-tui, which implements the minimum required configuration to get a running virtual machine from the cloud image. For this you can use several pre-configured profiles with the cloud- prefix.
The number of profiles will increase over time. In addition, you can independently create and send a profile through a public GitHub repository: https://github.com/cbsd/cbsd-vmprofile. These are the profiles that the CBSD uses.
In addition, if you notice that image acquisition speed is low (CBSD uses its own mirrors to duplicate images referenced by CBSD profiles), and you have a desire to help the project, please read the information on how to raise your own mirror: fetch_iso. You can send us a link to your mirror (or add it yourself via https://github.com/cbsd/cbsd-vmprofile, and thereby improve the quality for your country/region.
Note: In CBSD version 12.0.8, parameter ci_user_pubkey_user can accept not only ssh pubkey itself, but also the path to authorized_keys. In addition, if this parameter is set to .ssh/authorized_keys (value by default for 12.0.8+), this means that your node's ssh key will be used. ( ~cbsd/.ssh ). Pay attention to how looks blogin.conf in 12.0.8: if the virtual machine is created using cloud-init, the "cbsd blogin" command will use the custom login command using the node key and the user specified by you as ci_user_add.Thus, by running a virtual machine from cloud-init, you can immediately access it via ssh using the command: cbsd blogin.
bcreate from args
If you don’t like the dialog boxes, you can start the virtual machine from the cloud image as quickly as possible using bcreate by specifying the appropriate configuration parameters, for example:
                cbsd bcreate jname=centos1 imgsize=20g vm_cpus=1 vm_ram=4g vm_os_type=linux vm_os_profile=cloud-CentOS-7-x86_64 ci_jname=centos1 ci_fqdn=centos1.my.domain ci_ip4_addr=DHCP ci_g
w4=10.0.0.1 runasap=1

                cbsd bcreate jname=centos2 imgsize=40g vm_cpus=4 vm_ram=8g vm_os_type=linux vm_os_profile=cloud-CentOS-8-x86_64 ci_jname=centos2 ci_fqdn=centos2.my.domain ci_ip4_addr=192.168.0
.10/24 ci_gw4=192.168.0.1 runasap=1
pay attention to ci_ip4_addr and ci_gw4 - when using the DHCP value, make sure that you select the correct nodeippool range of addresses, and also that ci_gw4 points to the working IP of the gateway in this subnet.
Usage example
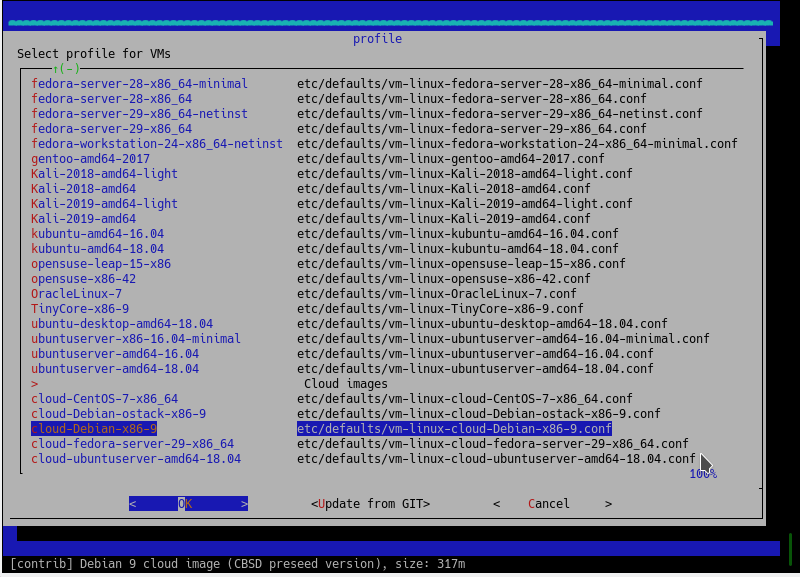
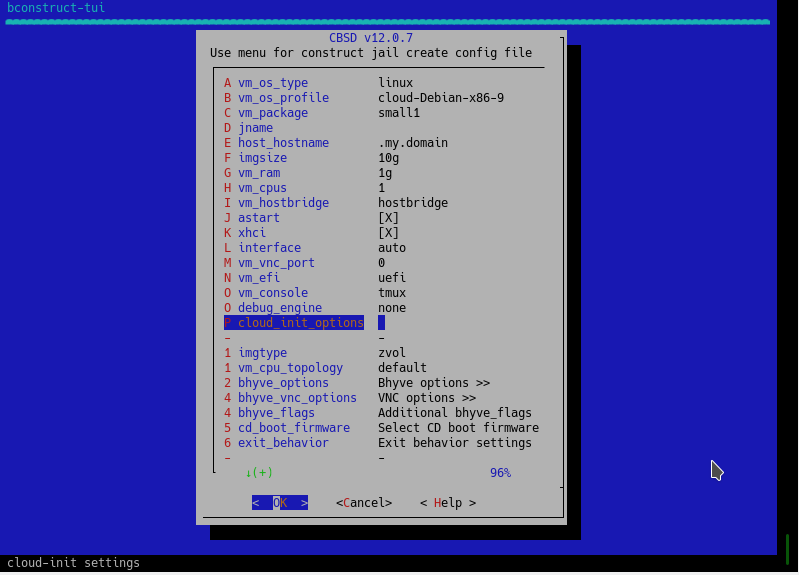
Profiles of cloud images are in the vm_os_profile menu. Select this item in the main menu:
At the bottom of the list, you will see an area with Cloud images, if these profiles are created in CBSD for the selected OS family:
Next, configure the network settings, user and public key of the guest machine:
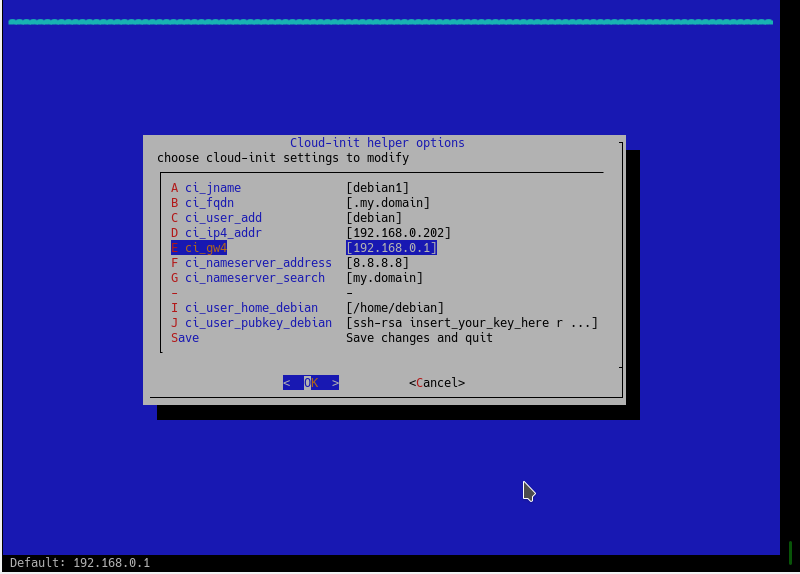
Further configuration and launch of a cloud-based virtual machine is no different from the main method. Good luck!
Virtual Machine Configuring
commands: bconfig, bset
                        % cbsd bconfig
                        % cbsd bset
Description:
Configuring the Virtual Machine Settings
Each virtual machine CBSD stores the settings in the SQLite3 database. To change the settings of a VM can serve command cbsd bconfig, TUI launches menu for changing the basic settings.
Description of relevant parameters, you can read on the page VM create
Custom scripts for starting and stopping action on jail
You can write your own scripts to be executed within the jail and in the master host on startup and shutdown of the environment. For this, the system directory of jail ( $workdir/jails-system/$jname/ ) have the following directories:
- master_poststart.d - scripts for executing in the master host after jail starts (Be careful, because the scripts are is not jailed)
- master_poststop.d - scripts for executiong in the master host after jail stops (Be careful, because the scripts are is not jailed)
- master_prestart.d - scripts for executing in master host before jail starts (Be careful, because the scripts are is not jailed)
- master_prestop.d - scripts for execution in master host after jail stops (Be careful, because the scripts are is not jailed)
- start.d - scripts for execution within jail when jail is starts. Analog of parameter exec.start from original jail.conf
- stop.d - scripts for execution within jail when jail is starts. Analog of parameter exec.stop from original jail.conf
- remove.d - (since CBSD 11.0.10) scripts for execution on remove command
Write scripts to the master_\* directories can be useful if at the start-stop jail you need to perform some action is not associated with content of environment - for example, create a ZFS snapshot, put rules in IPFW and etc.
In scripts, you can use CBSD variables, such as $jname, $path, $data, $ip4_addr, for example, by placing a script (with execute permission) in /usr/jails/jails-system/jail1/master_poststart.d/notify.sh:
                #!/bin/sh
                echo "Jail $jname started with $ip4_addr IP and placed on $path path" | mail -s "$jname started" [email protected]
You will receive notification upon startup cells by email: [email protected]
The functionality of execution custom scripts and the availability of variables in environments can play a big role in the integration of CBSD and external applications, such as Consul
As an example of use, see the article Example of using CBSD/bhyve and ISC-DHCPD (Serve IP address in bhyve through pre/post hooks)
As an example of use, see the article Example of using CBSD/jail and Consul (Register/unregister jail's via pre/post hooks, in Consul)
Custom behavior settings by exit codes
Commands: bconfig, bset, bconstruct-tui
                        % cbsd bconfig
                        % cbsd bset
                        % cbsd bconstruct-tui
Description:
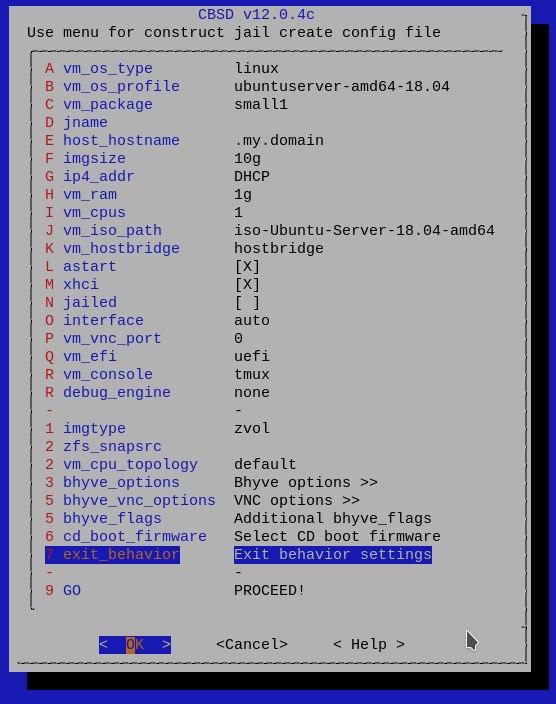
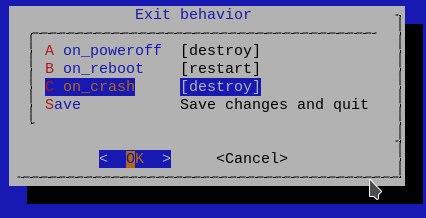
Configuring the behavior of the virtual machine at exit codes
Beginning with version 12.0.4 of CBSD, a behavior regulator has been added, depending on the virtual machine hypervisor exit code
You can reassign this behavior as a global profile (bhyve-default-default.conf), and/or individually for each virtual machine
To edit, you can use bset or the corresponding menu item in the bconstruct-tui or bconfig
Possible exit codes you can use:
- on_poweroff: the content of this element specifies the action to take when the guest requests a poweroff
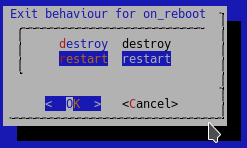
- on_reboot: the content of this element specifies the action to take when the guest requests a reboot
- on_crash: the content of this element specifies the action to take when the guest crashes
Possible behaviors that you can remap for each code:
- destroy: the domain will be terminated completely and all resources released
- restart: the domain will be terminated and then restarted with the same configuration
preserve: the domain will be terminated and its resource preserved to allow analysis(WIP, at the moment: XEN only)rename-restart: the domain will be terminated and then restarted with a new name(WIP, at the moment: XEN only)
bhyve virtual disk
Commands: bconfig, bset, bhyve-dsk
% cbsd bhyve-dsk mode=modify dsk_sectorsize=512/4096 jname='*'
Description:
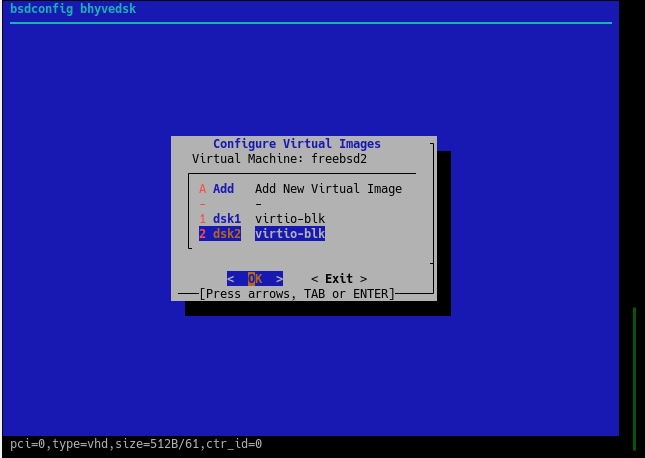
To work with bhyve virtual disks, use the cbsd bhyve-dsk command or the cbsd bconfig dialog with the bhyvedsk submenu.
list of disk
To list virtual disks, use:
% cbsd bhyve-dsk mode=list
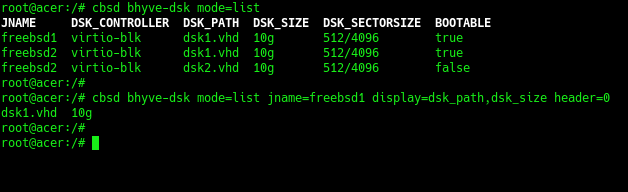
You can adjust the amount of information through arguments header=0 и display=
adding drives
To add a new virtual disk, use the command:
% cbsd bhyve-dsk mode=attach dsk_controller=XXX dsk_size=YYY
, where:
- XXX - type of controller: virtio-blk or ahci-hd
-
YYY - Desired disk space, for example: 10g. An example of a command that will create and connect a new virtual disk to the freebsd1 virtual machine:
% cbsd bhyve-dsk mode=attach jname=freebsd1 dsk_controller=virtio-blk dsk_size=10g
detaching and remove drives
If you want to disconnect a virtual disk WITHOUT physically deleting the image, use:
% cbsd bhyve-dsk mode=detach dsk_controller=XXX dsk_path=YYY
, where:
- XXX - The type of disk controller you are disconnecting. Must match what you see through mode=list
- YYY - The name of disk you are disconecting. Must match what you see through mode=list
After disconnecting, do not lose sight of your drive, as it is no longer registered in CBSD
If you want to disconnect and at the same time destroy the virtual disk, use the command:
% cbsd bhyve-dsk mode=remove dsk_controller=XXX dsk_path=YYY
, where:
- XXX - The type of disk controller you are delete. Must match what you see through mode=list
- YYY - The name of disk you are delete. Must match what you see through mode=list
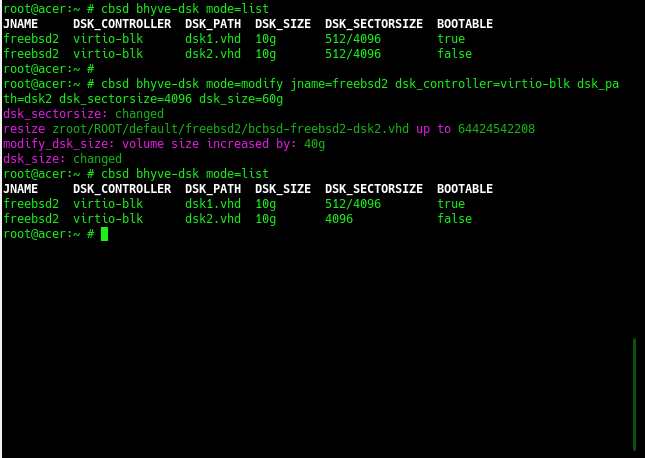
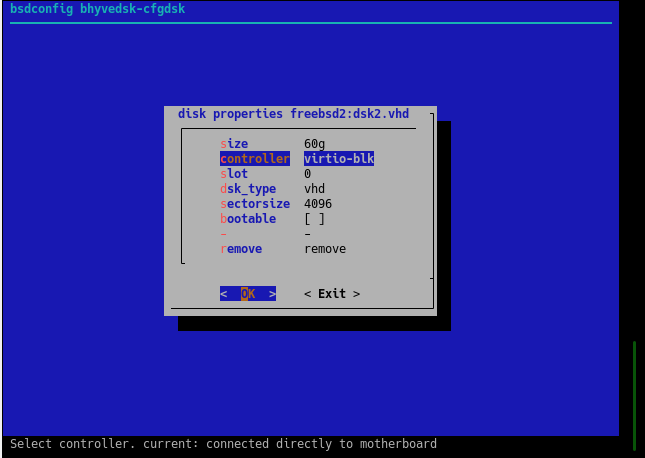
modification of properties of virtual disks
To modify the parameters of virtual disks, use the command:
% cbsd bhyve-dsk mode=modify jname=ZZZ dsk_controller=XXX dsk_path_YYY [param=value]
, where:
- ZZZ - VM name
- XXX - The type of disk controller you are modify. Must match what you see through mode=list
- YYY - The name of disk you are modify. Must match what you see through mode=list
Depending on the version of CBSD, the type of installation and the file system used, the set of parameters with which you can operate may differ
Basic parameters that are available on any file system:
- bootable - set disk as bootable, e.g: 1
- dsk_sectorsize - change disk sectorsize, e.g: 512,512/4096,4096 [*]
- dsk_size - increase the volume size of a virtual disk, for example: 30g (set size to 30Гб ),+10g (increase existing disk capacity by 10 GB) [**]
___
[*]
- choose the correct sectorsize before formatting the disk, because the data recorded with one value of sectorsize will not be available with another.
- when you specify a value through '/', the number on the left means logical sectorsize, the value on the right means physical sectors. Most preferred value: 512/4096 or 4096.
- you can reassign the default value in CBSD globally via bhyve-default-default.conf or in an individual virtual machine profile.
[**]
- virtual machines using cloud-init will resize/expand the guest disk automatically. If you do not use cloud-init, in addition to increasing the physical medium, you will need to expand the guest file system yourself through the appropriate utilities.
customization ZFS/zvol properties
The ZFS file system has a rich selection of settings and optimizations. Since CBSD works intensively with the automatic creation of large numbers of ZFS file systems and ZVOL volumes and various settings, you can change the settings that CBSD will use in these operations.
You can change the default settings for ZFS datasets and ZVOL volumes through the zfs.conf configuration file. For example, you can enable compression for GOLD images of cloud-init, change recordsize, volblockmodesize, etc.
Bhyve CPU topology
Commands: cpu-topology vm-cpu-topology vm-cpu-topology-tui
                        % cbsd cpu-topology
                        % cbsd vm-cpu-topology vm-cpu-topology-tui
                        % cbsd vm-cpu-topology-tui
Attention! CBSD works with the bhyve topology in a new method/way. Make sure you have D9930
Description:
Configuring and viewing the CPU topology of the bhyve virtual machine.
Adjustment of the CPU topology of virtual machines can be performed to improve the performance and optimization of computational operations, and in various tasks related to testing.
When virtual machines executing, it is important to understand that from the point of view of the hoster: the virtual processors of the virtual machine are the usual processes (in the case of bhyve, a separate vcpu is a thread in the hoster system).
It is assumed that the user has a minimal understanding of the work of CPU, memory and NUMA-domains. In addition, for effective configuration it is important to understand the type of activity and services of the OS of a particular guest. The most important is understanding the work of L1, L2 and L3 caches and the work of the processor with certain memory blocks.
Recall that L1, L2 cache is a cache for one core, whereas L3 and higher is a cache for the entire processor (socket).
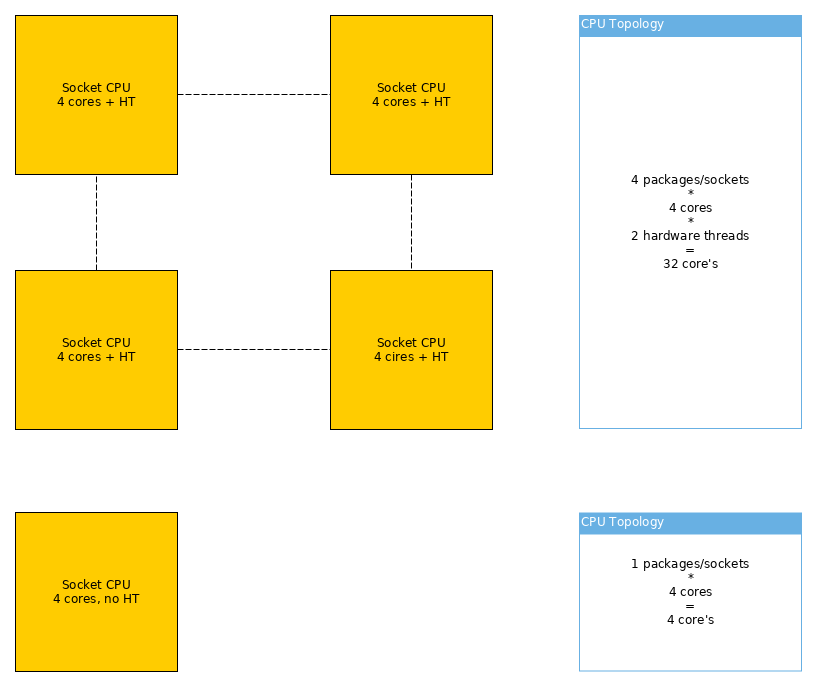
By changing the topology of the guest operating system, you can define the various virtual processor configurations as the number of sockets, the number of cores per socket and their location, and the presence of hyper-threading.
For example, having 8 cores, you can configure them as:
- 1 socket (virtual processor) with 8 core, without hyper-threading ( FreeBSD/SMP: 1 package(s) x 8 core(s) )
- 1 socket with 4 core, with HT ( FreeBSD/SMP: 1 package(s) x 4 core(s) x 2 hardware threads)
- 2 sockets with 2 core and HT ( FreeBSD/SMP: 2 package(s) x 2 core(s) x 2 hardware threads)
- 4 sockets with 2 core each ( FreeBSD/SMP: 4 package(s) x 2 core(s) )
- etc..
As such, the configuration of the virtual machine topology does not affect the speed of the virtual machine itself:
The configuration data becomes important, in conjunction with the settings for binding the virtual machine cores to a particular group of physical server cores (set_affinity, cpu-pinning), as will be discussed separately. The aim of this article is to consider bhyve possibilities and work with its configuration through CBSD.
To view the current topology on the host side, use the command cbsd cpu-topology. In addition to information about the current system, you can see a schematic representation of the sockets and cores that serve virtual environments
If the virtual machine is bound to a particular core of the physical machine, you will see its name opposite the given kernel of a specific socket. If there are no bindings/pinning, all virtual environments will be opposite each core - since they do not have restrictions on the use of certain kernels and they can migrate than are required by the OS OS master:
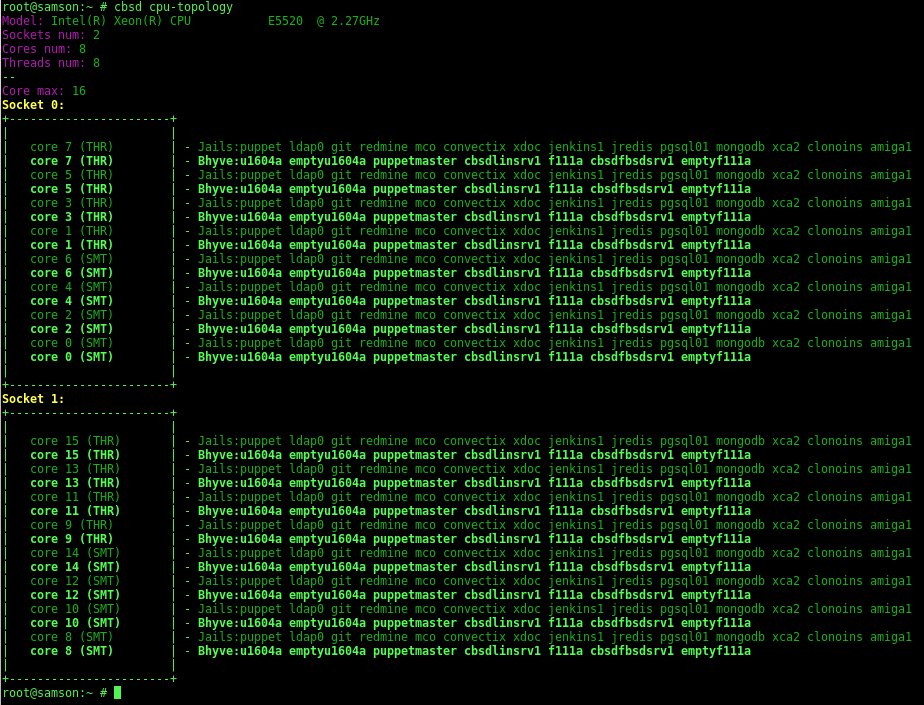
A socket is directly a physical processor (package) on your motherboard. If the processor supports hyper-threading (and it is enabled), the virtual cores will be marked as THR
You can create any number of profiles for the topology. You can view their list using vm-cpu-topology:
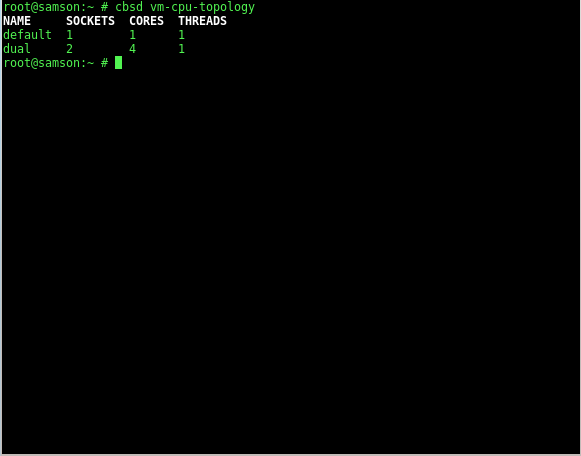
You can delete or add new ones through the TUI command interface vm-cpu-topology-tui
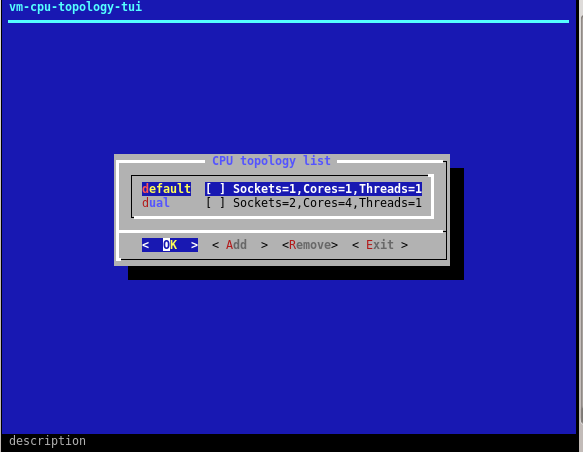
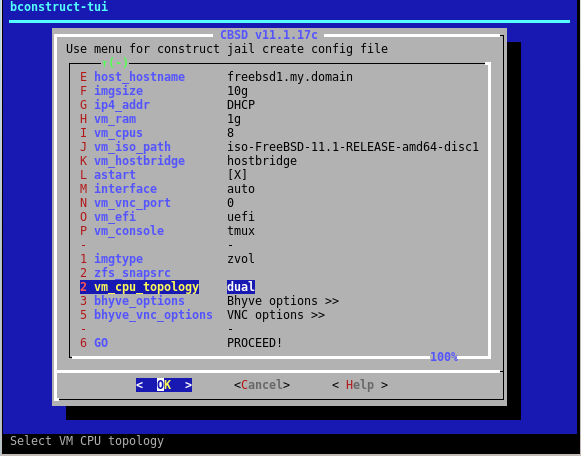
Profile names must be unique and the application of this or that topology is performed through the command bset, bconfig. And also, the choice of topologies will be available when creating a virtual machine in bconstruct-tui:
starting and stoping VM
commands: bstart, bstop
                        % cbsd bstart jname=vm1
                        % cbsd bstart vm1 vm2 ... vmX

                        % cbsd bstop jname=vm1
                        % cbsd bstop vm1 vm2 ... vmX
Description:
bstop command send SIGTERM signal to virtual domain for soft shutdown. In the event that the virtual machine does not stop during hard_timeout (by default: 30) seconds, CBSD will terminate the process forcibly. Use noacpi=1 args for instant/hard poweroff (without sending SIGTERM) virtual environment or hard_timeout=X to change the interval wait for soft off
Running virtual machines happens when you start cbsd/server automatically if parameter astart (auto-start) corresponding VM is set to 1 This setting can be through cbsd bconfig or cbsd bset. When you stop the server or service cbsdd, automatically stops all running virtual machines. Running VM manually by the command:
% cbsd bstart jname=vm1
or
% cbsd bstart vm1
or
% cbsd bstart vm1 vm2 vm3 ..
(to run multiple virtual machines as a command)
If the start/bstop command run with no arguments, this will list all inactive/active VM for interactive selection
If you have the appropriate build of FreeBSD and CBSD not less 11.2.0, you can take advantage of instant start of the virtual machine from checpoint, bypassing the boot phase. To do this, use the argument checkpoint= with name of checkpoint
CBSD Bhyve network options
So, there are the following network options:
- - Bridge network: e1000, virtio ( + NAT )
- - Point-to-point network from bhyve to hoster via tap: e1000, virtio
- - Private virtual switch via VALE: only virtio
- - Pass-thru and SR-IOV ( ppt device )
Options 1 by default:
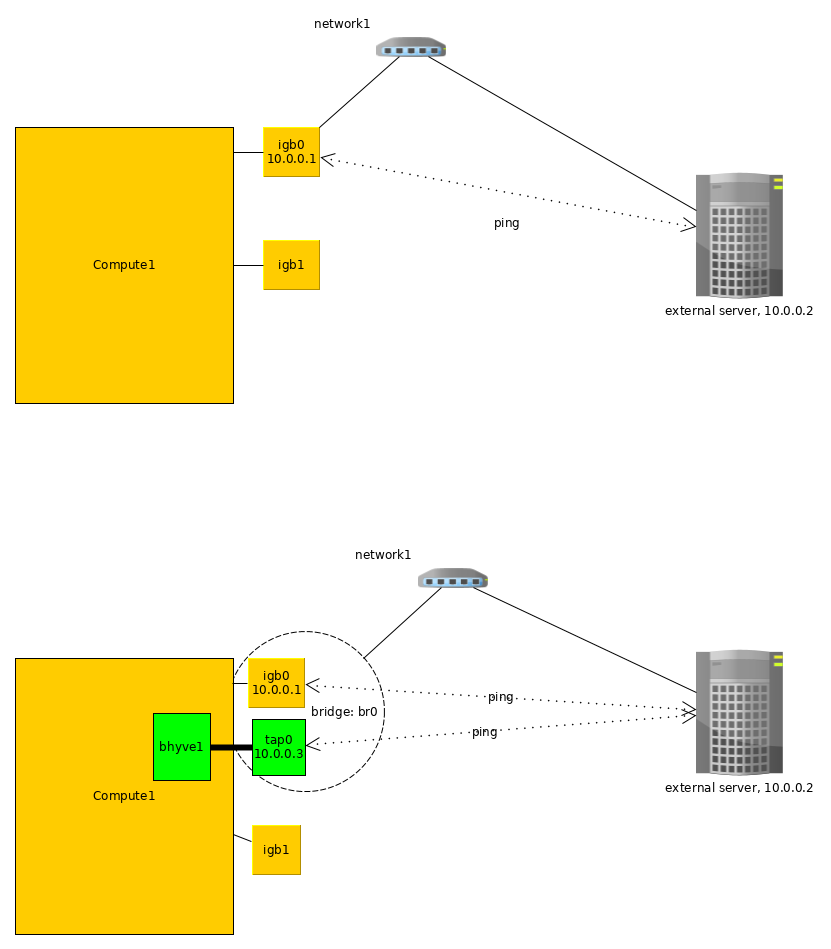
Options 1: Bridge network (auto)
When interface in bhyve settings sets to 'auto', CBSD try to:
- a) determine default interface uplink via: 'route -n get 0.0.0.0'
- b) create tap interface for bhyve
- c) create bridge interface
- d) add into bridge interface tap interface from bhyve and uplink interface
So, networking similar to vnet/jail - each devices on L2 can exchange with bhyve direcrly and bhyve in the same L2 network as uplink interface
When interface in bhyve settings sets to any inteface behavior the same except (a) - interface already know
How to:
- 1) cbsd bconstruct-tui -> choose os_profile + jname -> [GO] (proceed)
- 2) cbsd bstart
Options 2: Bridge network (manual)
If you want to control bridge/uplink by yourself this is method for you. You must initialize and configure the bridge interface yourself, regardless of CBSD> and select this bridgeX as VM interface
When interface of VM = bridge*, the CBSD will not configure and delete selected bridge when the virtual machine starts and stops.
How to:
- 1) cbsd bconstruct-tui -> choose os_profile + jname -> interface (select your bridge in the list) -> [GO] (proceed)
- 2) cbsd bstart
Or via bconfig (choose vm):
- bhyvenic -> nicX -> nic_parent -> (select your bridge in the list)
Options 3: Point-to-point network from bhyve to hoster
Direct network between bhyve and hoster. In this case, in order to give the network in the bhyve, it is necessary to enable routing of packets between bhyve and hoster tap networks. As a rule in this case, the default gateway for the bhyve instance is the host on which it is launched. No bridge, only tap.
How to:
- 1) cbsd bconstruct-tui -> choose os_profile + jname -> [GO] (proceed)
- 2) cbsd bconfig (choose vm)
- 3) (in bconfig):
bhyvenic -> nic1 -> nic_parent -> [choose 'disabled'] - 4) cbsd bstart
- 5) (on hoster):
find tap interface for bhyve (by description), e.g: tap2
choose network for interconnect between hoster and bhyve, e.g:
192.168.1.0/24
set's one IP from this network in the hoster side:
ifconfig tap2 192.168.1.1/24 - 6) via VNC enter into bhyve instance and sets second IP from this network:
ifconfig vtnet0 up
ifconfig vtnet0 192.168.1.2/24
Now, bhyve can ping hoster via:
ping 192.168.1.1
And you can set default route to hoster and route traffic as usual:
(on bhyve):
route add default 192.168.1.1
Also, bhyve with 192.168.1.1 available from hoster via 'ssh 192.168.1.2'
Options 4: VALE switch
We can create any number of virtual private switch via VALE. Bhyve which are commutated for example in 'vswitch1' can ping only each other VM in vswitch1, but nothing else.
For example:
[sw1]
| \
b1 b2
[sw2]
| \
b3 b4
bhyve (b1) can ping (b2), and (b3) can ping (b4), but other host is unavailable.
Howto:
- 1) create virtual switch:
cbsd valecfg-tui -> add name (e.g sw1) - 2) cbsd bconstruct-tui -> choose os_profile + jname -> [GO] (proceed)
- 3) cbsd bconfig (choose vm)
- 3) (in bconfig):
bhyvenic -> nic1 -> nic_parent -> [choose 'vale:sw1'] - 4) cbsd bstart
In this case, you can assign into bhyve any network/IPs - this is not available from any places.
If create second virtual machine and also attach to vale:sw1, this host can each other in VALE switch.
This options usefull for hosting and customer:
Each client receives personal private switch and its virtual machines are only connected to this switch. No collision between same network with other client! And to get internet access, client must install 'Gateway/Internet appliance' - small virtual machine like in Amazon AWS with two interfaces - one of them is connected to client's private switch (so that other machines can use it as a gateway) and second interface - connected to bridge on the hoster.
schematically it might look like this:
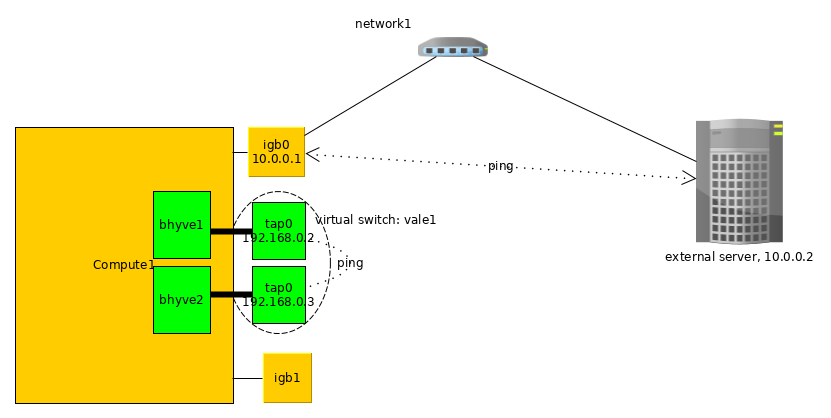
Options 4: VALE switch + external route via vether(4)
You may want to route internal VALE traffic to external network. You can use the epair(4) or vether(4) interface ( or a GW instance (e.g: OPNSense, pfSense)-based with two interfaces ) for these purposes.
Full example:
cbsd valecfg-tui
Create vale switch vale1 named
pkg install -y net/vether-kmod
/sbin/kldload if_vether
/sbin/ifconfig vether1 create
/sbin/ifconfig vether1 10.0.0.1/24 up
/usr/local/cbsd/tools/vale-ctl -h vale1:vether1
Hint: modern versions of FreeBSD have valectl in base: /usr/sbin/valectl
Now you have gateway from external network stack inside VALE switch.
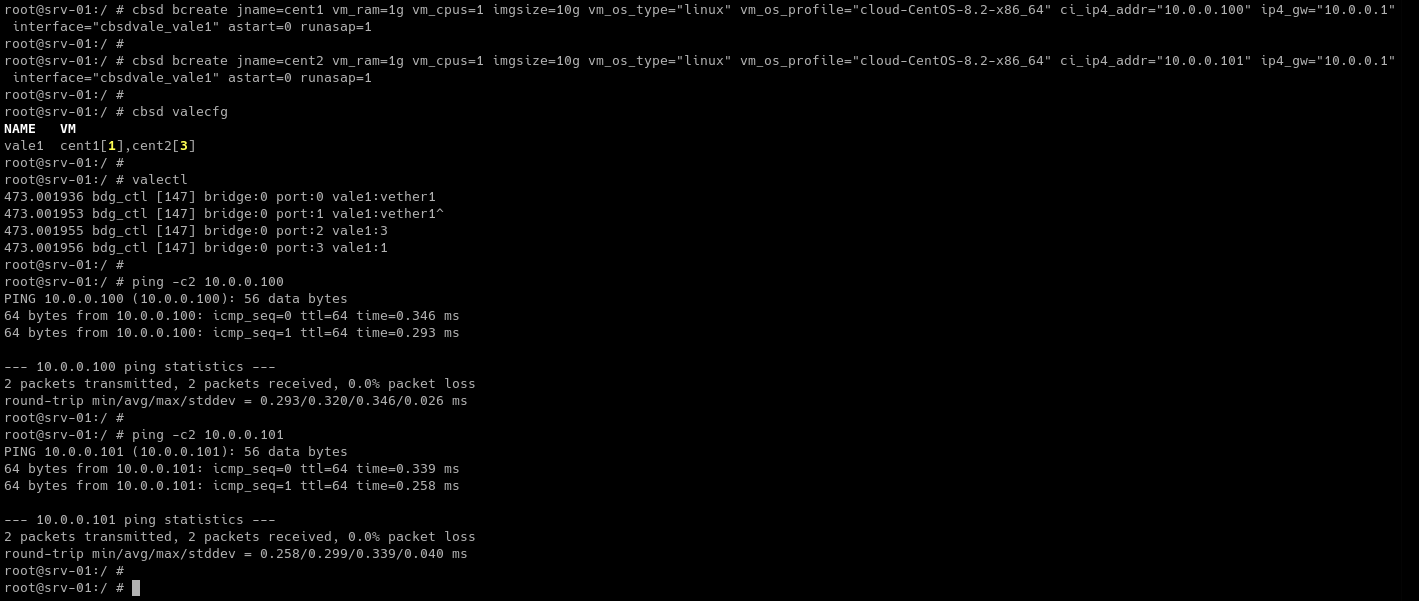
now we will create several VMs in the vale1 VALE switch:
cbsd bcreate jname=cent1 vm_ram=1g vm_cpus=1 imgsize=10g vm_os_type="linux" vm_os_profile="cloud-CentOS-stream-9-x86_64" ci_ip4_addr="10.0.0.100" ip4_gw="10.0.0.1" interface="cbsdvale_vale1" astart=0 runasap=1
cbsd bcreate jname=cent2 vm_ram=1g vm_cpus=1 imgsize=10g vm_os_type="linux" vm_os_profile="cloud-CentOS-stream-9-x86_64" ci_ip4_addr="10.0.0.101" ip4_gw="10.0.0.1" interface="cbsdvale_vale1" astart=0 runasap=1
ping -c2 10.0.0.100
ping -c2 10.0.0.101
Hint: you may want to override the parameters to use the VALE switch by default:
cat >> ~cbsd/etc/bhyve-default-default.conf  <<EOF
create_cbsdsystem_tap=0
interface="cbsdvale_vale1"
ci_gw4="10.0.0.1"
EOF
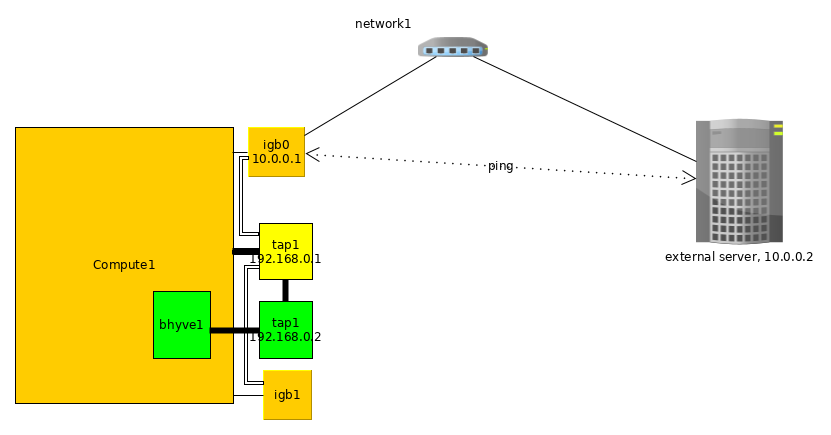
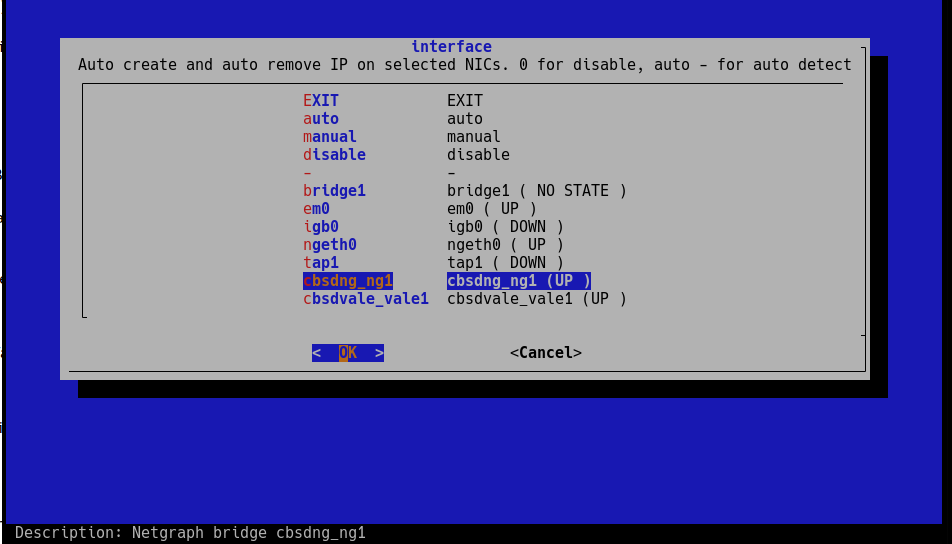
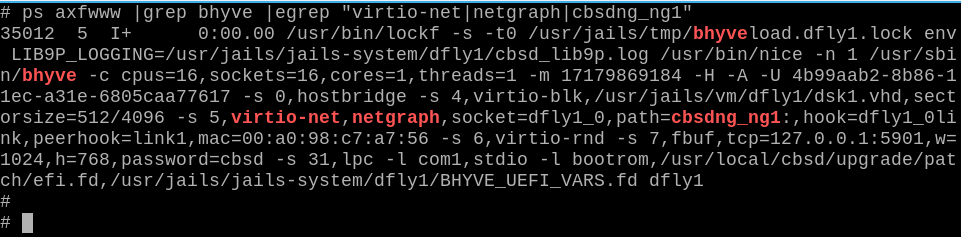
Options 5: Netgraph bridge
CBSD can use netgraph(3) as bhyve network backend. Сurrently only bridge is supported. By default CBSD searches for and uses interfaces named cbsdng_ngX:
# ngctl mkpeer . eiface test ether
# ngctl mkpeer ngeth0: bridge ether link99
# ngctl name ngeth0:ether cbsdng_ng1
# ifconfig ngeth0 192.168.1.1/24 up
As result:
bhyve PCI Passthrough
Commands bhyve-ppt
% cbsd bhyve-ppt
Description:
CBSD allows you to configure bhyve arguments to throw devices into the guest, if your hardware supports it
Attention! Read the information on the page FreeBSD Wiki: bhyve pci_passthru
In order to mark the device as passthrough, you must put the parameter in /boot/loader.conf as described in the wiki page, for example:
pptdevs="2/0/0"
If you need to specify more than one device:
pptdevs="2/0/0 1/2/6 4/9/0"
Please note that when using pptdevs, vmm the module must be initialized on /boot/loader.conf stage to pick up these records.
If you init/load vmm after kernel loading, for example via kldload, then pptdevs will not work.
Next, after booting up the system, make sure that CBSD sees the marked devices. With the command 'cbsd bhyve-ppt mode=list' you should see your devices:
% cbsd bhyve-ppt mode=list
5/1/0 :  DGE-528T Gigabit Ethernet Adapter :  D-Link System Inc : -
0/31/3 :  7 Series/C216 Chipset Family SMBus Controller :  Intel Corporation : -
Now, by using the ppt device ( 5/1/0 or 0/31/3 in this example) you can attach or detach this device to a specific virtual machine:
cbsd bhyve-ppt mode=attach jname=vmname
cbsd bhyve-ppt mode=detach jname=vmname
SR-IOV
The work bhyve / CBSD was tested including with SR-IOV technology
In this case, the ppt devices are no different from those that you configure with pptdevs
                % cbsd bhyve-ppt mode=list
                1/0/131 : X540 Ethernet Controller Virtual Function : Intel Corporation : -
                1/0/133 : X540 Ethernet Controller Virtual Function : Intel Corporation : -
                1/0/135 : X540 Ethernet Controller Virtual Function : Intel Corporation : -
                1/0/137 : X540 Ethernet Controller Virtual Function : Intel Corporation : -
                1/0/139 : X540 Ethernet Controller Virtual Function : Intel Corporation : -
                1/0/141 : X540 Ethernet Controller Virtual Function : Intel Corporation : -
                1/0/143 : X540 Ethernet Controller Virtual Function : Intel Corporation : -
                1/0/145 : X540 Ethernet Controller Virtual Function : Intel Corporation : -
                1/0/147 : X540 Ethernet Controller Virtual Function : Intel Corporation : -
                1/0/149 : X540 Ethernet Controller Virtual Function : Intel Corporation : -
                1/0/151 : X540 Ethernet Controller Virtual Function : Intel Corporation : -
                1/0/153 : X540 Ethernet Controller Virtual Function : Intel Corporation : -
                1/0/155 : X540 Ethernet Controller Virtual Function : Intel Corporation : -
                1/0/157 : X540 Ethernet Controller Virtual Function : Intel Corporation : -
                1/0/159 : X540 Ethernet Controller Virtual Function : Intel Corporation : -
                1/0/161 : X540 Ethernet Controller Virtual Function : Intel Corporation : -
                1/0/163 : X540 Ethernet Controller Virtual Function : Intel Corporation : -
                1/0/165 : X540 Ethernet Controller Virtual Function : Intel Corporation : -
                1/0/167 : X540 Ethernet Controller Virtual Function : Intel Corporation : -
Each VF (Virtual Function) you can connect to any virtual machine through the above: cbsd bhyve-ppt mode=attach
bhyve shared folders via virtio-p9
Commands bhyve-p9shares
% cbsd bhyve-p9shares
Description:
This feature available from CBSD 11.1.7 and above.
Shared folders are used to exchange files between virtual machines or between a virtual machine and a host system.
This feature works only if your system supports VirtFS/P9 and bhyve support virtio-p9.
At the time of writing this article (2017-10-01), such a system is TrueOS, whereas for FreeBSD a patch is prepared and loaded into Phabricator: D10335
In addition, working with shared folders will only be available if your guest OSs have support for mounting the p9 file system via virtio.
To configure shared folders, you need to have the directory to share on on the file system, which will be presented to the virtual machine and sets name (one word) for this resources for guest OS.
To view existing shared folders, use the command:
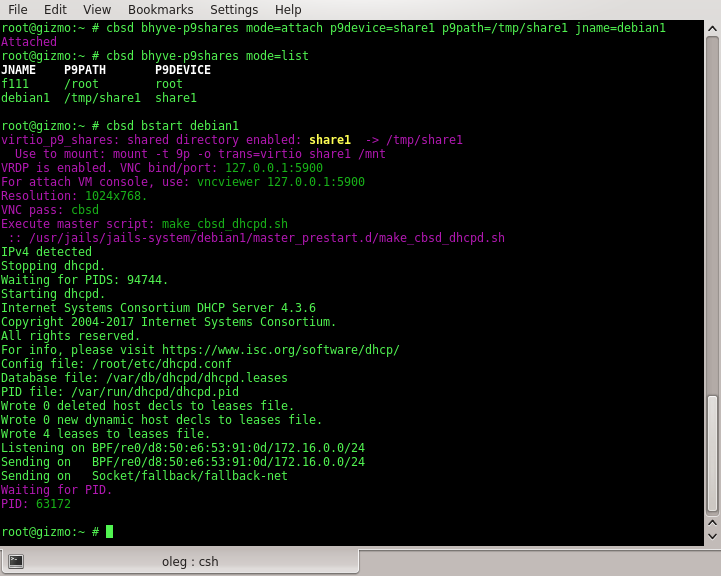
% cbsd bhyve-p9shares mode=list

JNAME    P9PATH       P9DEVICE
f111     /root        root
debian1  /tmp/share1  share1
debian1  /tmp/share2  share2
Or for an individual virtual machine:
% cbsd bhyve-p9shares mode=list jname=XXX
To enable shared folders for a specific virtual machine, use mode=attach with p9path,p9device arguments to specify a directory and a shared resource name, e.g:
% cbsd bhyve-p9shares mode=attach p9device=share1 p9path=/tmp/share1 jname=debian1
To disable shared folders for a specific virtual machine, use mode=detach with p9device argument.
After running the virtual machine, you can connect shared folders in different ways, depending on the specific distribution. For example, in a Debian-based Linux distribution, this is done through a 9mount package and this command:
% mount -t 9p -o trans=virtio sharename /mnt
or:
% 9mount -i 'virtio!sharename' /mnt
bhyve shared folders via VirtFS/virtio-p9:
Priority launch environments
Commands: jorder, jorder-tui, border, border-tui
% cbsd jls display=jname,b_order
Description:
Sometimes a jail/vm will require an already running service from another machine/jail before it is launched. Examples might be a database SQL or a running LDAP.
In this case, you can edit Boot Order (b_order in jail/vm settins)
By default, all environments are created with b_order set to 10 (which is defined in the profile and can be changed)
If you need jail2 to be launched before jail1, its value for b_order must be set to a lower one than that of the second jail.
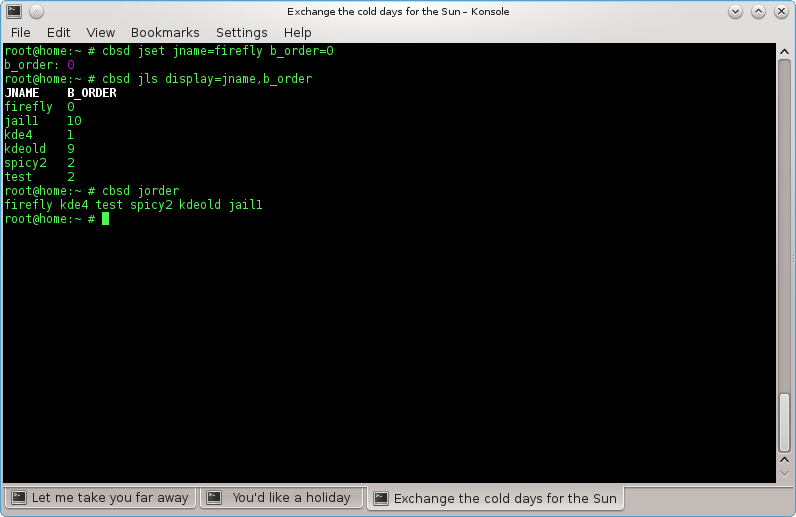
You can display the current configuration with the command jls:
% cbsd jls display=jname,b_order
JNAME    B_ORDER
firefly  3
jail1    10
kde4     1
kdeold   9
spicy2   2
test     2
This sample configuration will launch kde4 first while jail1 will come up last
You can also display the sequence using the command jorder
% cbsd jorder
In what sequence jail printer - in this sequence they will run
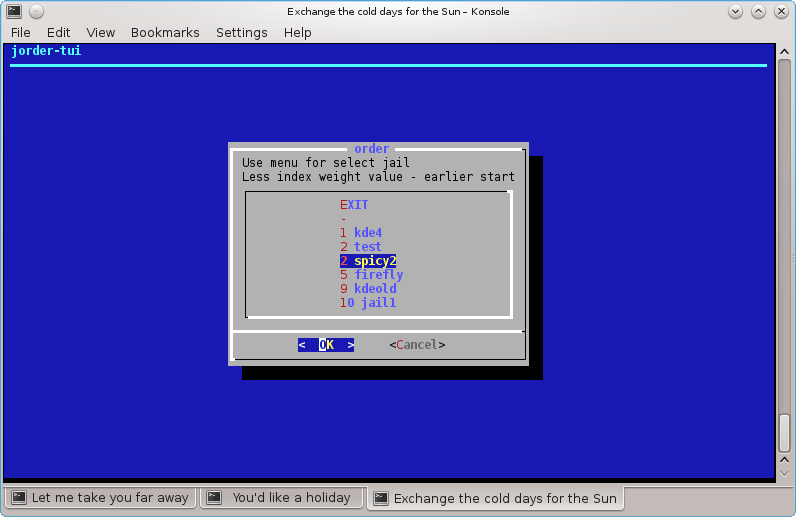
To edit a launch sequence use jset or the TUI-editor jorder-tui
To edit bhyve priority, use the commands border or border-tui
Removal Virtual Machine
command: bremove
% cbsd bremove jail1 jail2 ..
Description:
Removing a virtual machine affects all files in one way or another connected with the VM:
- a) directory or ZFS fileset with images of virtual machine
- b) statistics and the description of the virtual machine
- c) snapshots, if it was
In case when bremove runs on a running virtual machine, the work of the guest OS is automatically interrupted.
Example:
% cbsd bremove redhat1
Virtual Machine Renaming
command: brename
% cbsd brename
Description:
Performs renaming the virtual machine and the corresponding directory data in the new name. Can be executed only on the inactive virtual machine. As required parameters:
- old — old VM name
- new — new VM name
Example (renaming debian1 VM into debian50:
% cbsd brename old=debian1 new=debian50
List of Virtual Machines
comannd bls
% cbsd bls
Description:
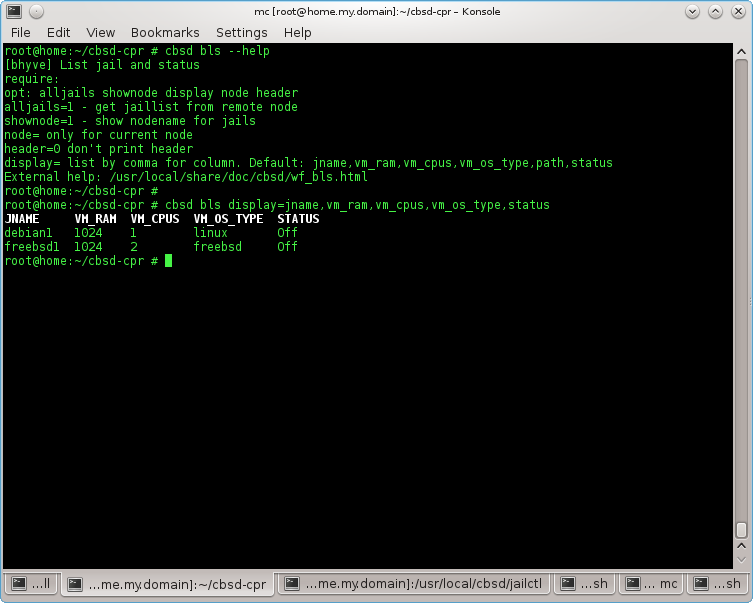
Displays the list of virtual machines on the local node or all of the added nodes. through argument display you can specify the fields to fetch the data. If display not specified, the value specified in the file $workdir/etc/defaults/jls.conf, which you can change at its discretion through $workdir/etc/bls.conf
All possible parameters for samples described in the file $workdir/share/local-bhyve.schema
- JNAME — Name of virtual machine
- VM_RAM — memory space, in MB
- VM_CPUS — The number of virtual CPU cores
- VM_OS_TYPE — Guest OS type
- PATH — directory in which there are images of hard disks of the virtual machine
- STATUS — state of virtual machine
If added to the local server RSA/DSA keys remote node, you can display all the virtual machines in the farm through
% cbsd bls alljails=1
or
% cbsd bls alljails=1 shownode=1
to display the name of the node that hosts this virtual machine.
Example:
% cbsd bls
Using VNC to connect to the bhyve virtual machine
Commands bconfig, bconstruct-tui
                        % cbsd bconfig
                        % cbsd bconstruct-tui
Description:
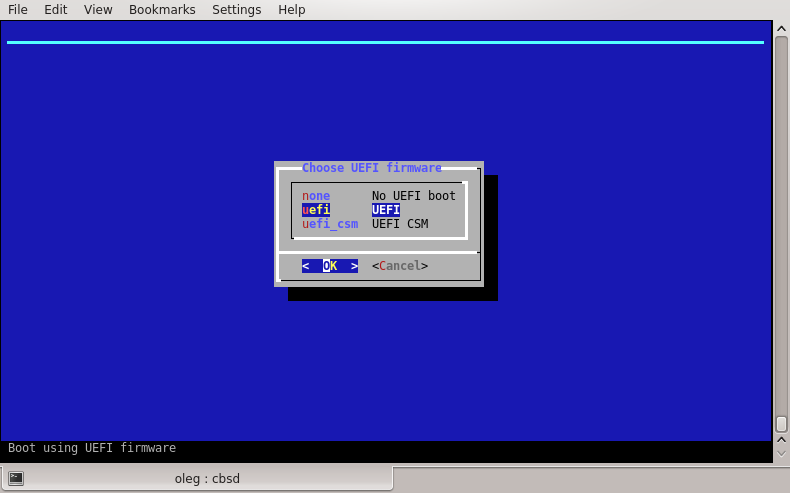
Currently, VNC is possible only when the virtual machine startup through UEFI mode
To do this, when you create a new virtual machine (or editing through bconfig), make sure that:
value of vm_efi set to uefi:
If you want to fixate the VNC port, use the menu item vm_vnc_port
If vm_vnc_port set to 0 - CBSD automatically find the first available port for the VNC connection
If vm_vnc_port set to 1 - CBSD it will not open a port for VNC
If vm_vnc_port any other numerical value, for example 5905 - CBSD will always use current VNC port for a virtual machine
Beginning with CBSD version 11.1.0, a VNC connection requires a password that is specified in the vnc.conf configuration file (~cbsd/etc/defaults/vnc.conf):
In order to change (or remove) the password, duplicate your own value of default_vnc_password via ~cbsd/etc/vnc.conf file:
% echo default_vnc_password='test' > ~cbsd/etc/vnc.conf
If default_vnc_password takes an empty value, the password for the VNC was not set.
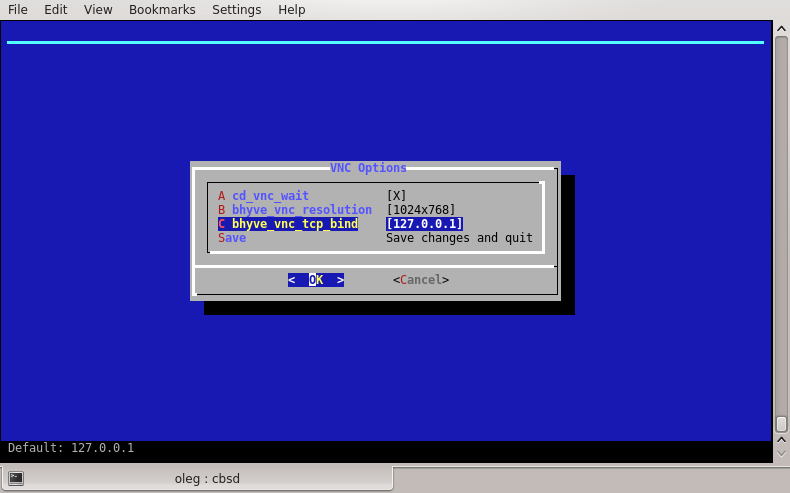
Note that by default, the VNC port opens on loopback address: 127.0.0.1
This is done for security reasons, or any user can connect to the VNC conclusion of your virtual machine
To connect to the VNC on a remote server, please use SSH tunnels, or any proxies that are protected by a password or a certificate
If you want to work with VNC directly, just change the parameter bhyve_vnc_tcp_bind from 127.0.0.1 to 0.0.0.0 via vnc_options menu. In this case, to connect the port to be opened all
Attaching to terminal
command: blogin
% cbsd blogin
Description:
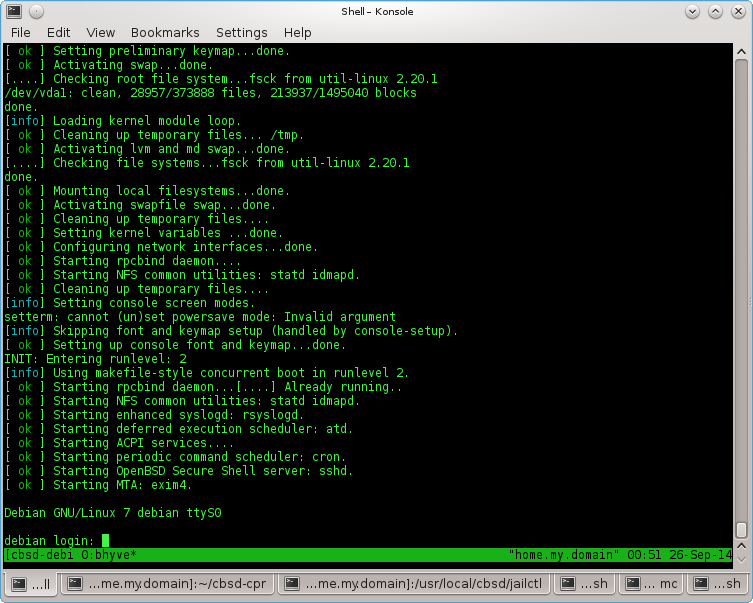
Execute tmux session, connecting to the console output of the virtual machine
To disconnect from the terminal (and off tmux session), press the key combination: Ctrl+b, d (Hold Ctrl press b, release both key and hit d)
Example:
% cbsd blogin debian1
You can customize the command, redefining the action on you more suitable
This is achieved through the configuration file blogin.conf and the parameter login_cmd.
The file can be placed for the individual environment in the directory $workdir/jails-system/$jname/etc (for example, virtual machines belong to different system administrators, and you can use different logins when connecting via ssh), and globally, overwriting the value from $workdir/etc/defaults/blogin.conf. To do this, create a file with your configuration in the directory $workdir/etc/
With a custom call, you can use CBSD variables - for this or that environment
For example, if you want instead of the standard behavior, when the blogin launched the VNC client, the file $workdir/etc/blogin.conf can look like this:
login_cmd="su -m user -c \"vncviewer ${bhyve_vnc_tcp_ipconnect}:${vm_vnc_port}\""
If you want the ssh connection to occur, this file might look like this:
login_cmd="/usr/bin/ssh your_user@${ipv4_first}"

Cloning a Virtual Machine
command: bclone
% cbsd bclone
% cbsd brclone
Description:
Performs cloning a virtual machine to a new one. As required arguments, specify source/original VM through old and a new name as an argument new
Attention: Since 11.0.10 version, CBSD on ZFS-based hosters will be use ZFS clone features!
ZFS clone features is ultra fast operation (thanks to Copy-on-write), but imposes some restrictions - you will be dependent on the parent snapshot. If you try to remove parent environment, CBSD automatically executes the zfs promote command, but when you works with snapshot independently - just keep it in your mind
You can control this behaviour via clone_method= argument or, to set it globally, use rclone.conf and bclone.conf to overwrite settings from 'auto' to 'rsync':
                % echo 'clone_method="rsync"' > ~cbsd/etc/rclone.conf
                % echo 'clone_method="rsync"' > ~cbsd/etc/bclone.conf
When ~cbsd/etc/bclone.conf (for bclone) and ~cbsd/etc/rclone.conf contain:
clone_method="rsync"
Clone will not use zfs clone even on ZFS filesystem and you will get full copy via rsync

Example: Cloning a virtual machine in debian1 to debian2:
% cbsd bclone old=debian1 new=debian2
Virtual Machine EXport
command: bexport
% cbsd bexport
Description:
Export the VM file (* .img). The argument jname the name of the virtual machine. img-file is saved in the directory $workdir/export. The original VM after exporting remains unchanged.
EXample (export VM debian1 to $workdir/export/debian1.img):
% cbsd bexport jname=debian1
Virtual Machine Import
command: bimport
% cbsd bimport
Description:
Import from image (* .img) virtual machine. The argument jname the full path to the file or the name of the image (without extension .img), which must be located in the appropriate directory ($workdir/import). img-file after the import is still in place. Additionally, you can import a virtual machine from an image in the alternate name (for example, you want to deploy the image of the debian1 from debian1.img, however, your system already has a VM with the same name). In this case, use the argument newjname
Example:
Import virtual machine from the file /tmp/debian1.img:
% cbsd bimport jname=/tmp/debian1.img
Import debian2.img placed in $workdir/import under new name debian5:
% cbsd bimport jname=debian2 newjname=debian5
Checkpoints, hibernation and pauses of the bhyve virtual machine
Commands bcheckpoint, bsuspend, bpause
To use this feature the kernel (vmm.ko module) and bhyve userland utilites must be compiled with BHYVE_SNAPSHOT flags. Please add into /etc/src.conf:
WITH_BHYVE_SNAPSHOT=yes
And add into kernel config file:
options BHYVE_SNAPSHOT
Then rebuild the world/kernel.
The functionality of checkpoints and suspend of a virtual machine is the freezing of the virtual environment, saving the entire state to disk, from which you can return the system to its previous state without having to reboot the environment
Checkpoints
In CBSD to work with checkpoints use the bcheckpoint command, which has the following syntax:
cbsd bcheckpoint [jname=] [mode=] [name=] [poweroff=]
where:
- - jname: (required) the name of the environment, for example: freebsd1
- - mode: (required) action relative to the environment: create (create checkpoint), list (list of checkpoints created), destroyall (destroy all checkpoints)
- - name: (optional) specify an alternate checkpoint name, by default: checkpoint
- - poweroff: (optional). When poweroff=1, CBSD will automatically shut down the virtual machine instantly (via bstop noacpi=1) on the fact of checkpoint creation.
                % cbsd bls
                JNAME     JID    VM_RAM  VM_CURMEM  VM_CPUS  PCPU  VM_OS_TYPE  IP4_ADDR  STATUS  VNC_PORT
                freebsd1  21923  1024    24         1        0     freebsd     DHCP      On      127.0.0.1:5900

                % cbsd bcheckpoint mode=create jname=freebsd1
                Waiting and sure that the info is written on the disk: 1/5
                Waiting and sure that the info is written on the disk: 2/5
                Waiting and sure that the info is written on the disk: 3/5
                Waiting and sure that the info is written on the disk: 4/5
                Waiting and sure that the info is written on the disk: 5/5
                Checkpoint was created!: /usr/jails/jails-system/freebsd1/checkpoints/checkpoint.ckp

                % cbsd bcheckpoint mode=create jname=freebsd1 name=after_update
                Waiting and sure that the info is written on the disk: 1/5
                Waiting and sure that the info is written on the disk: 2/5
                Waiting and sure that the info is written on the disk: 3/5
                Waiting and sure that the info is written on the disk: 4/5
                Waiting and sure that the info is written on the disk: 5/5
                Checkpoint was created!: /usr/jails/jails-system/freebsd1/checkpoints/after_update.ckp

                % cbsd bcheckpoint mode=list jname=freebsd1
                Created checkpoint for freebsd1:
                after_update
                checkpoint
Having created checkpoints, you can return to the desired state via the command bstart with checkpoint args
A short demo at an early stage of development on Youtube
Suspend mode
WIP
VM Pauses
WIP
Bhyve Live migration
command: bmigrate
The implementation of this feature in bhyve is grateful to the Politehnica University of Bucharest and in particular: Elena Mihailescu and Mihai Carabaș.
At the time this page was published, this functionality was not available in the FreeBSD codebase and was obtained from the project page on GitHub (FreeBSD-UPB)
This functional is a continuation of the checkpoints functional
Primary requirements:
At the moment, the necessary condition is the presence of DFS, which in the case of CBSD should not be a problem ( more: lack of binding to ZFS). At the moment, the work tested on NFSv3,v4 and GlusterFS ( Ceph in the testing process )
For a successful bhyve live migration procedure, you also need to have servers that are closest to the technical specifications (architecture, CPU). Currently, the bhyve hypervisor does not support alignment of CPU instructions (editing and customization of CPUID) in the presence of different processors (different generation/models)
Besides CBSD nodes, which are exchanged virtual machines, must be added to the CBSD cluster via the node command.
In the process of live migration, the node-source uses the functionality to create a deferred task on the node-destionation through cbsd task, so make sure that you have a running process 'cbsdd' ( is controlled by the cbsdd_enable=YES parameter in the /etc/rc.conf config file)
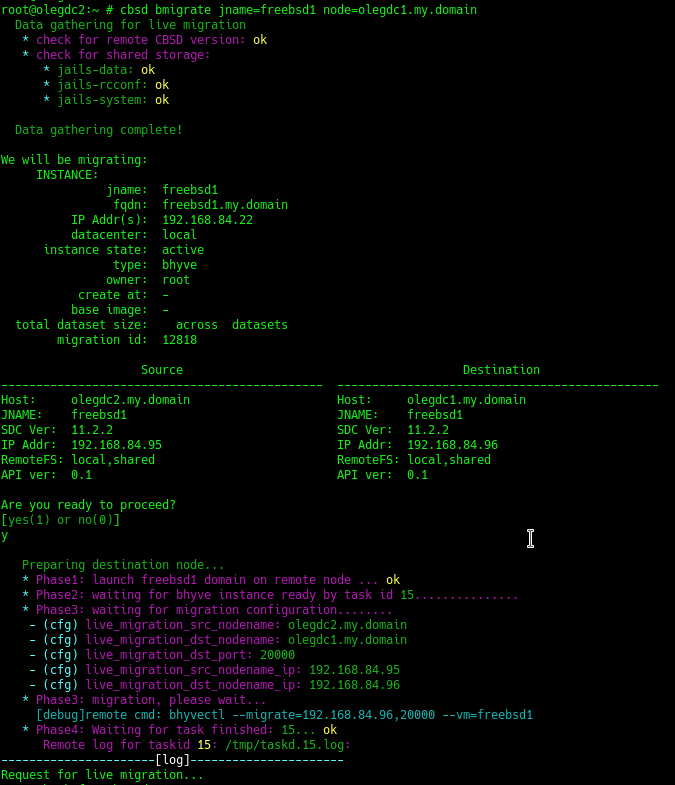
To migrate, use the command bmigrate, which has two arguments - the name (jname) a moving virtual machine and the destination node (node)
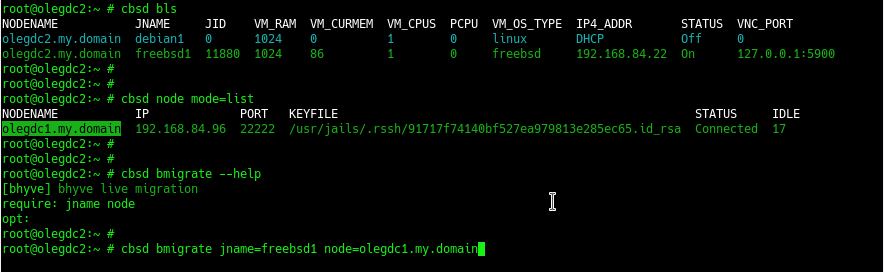
During the migration, the script performs a preliminary check for the compatibility of the nodes, including the presence of common/shared directories (this is jails-data, jails-rcconf, jails-system directories in the CBSD working environment)
A small demo at an early stage of development: Youtube::FreeBSD bhyve live migration, first overview
A small demo at an early stage of development: Youtube::FreeBSD bhyve live migration: FreeBSD guest + networking (no sound)
A small demo at an early stage of development: Youtube::FreeBSD bhyve live migration: Linux Debian guest + networking (no sound)
See also: checkpoints, taskd, CPU topology
Running the bhyve hypervisor in gdb/lldb via CBSD
commands: bconfig, bconstruct-tui
                        % cbsd bconstruct-tui
                        % cbsd bconfig
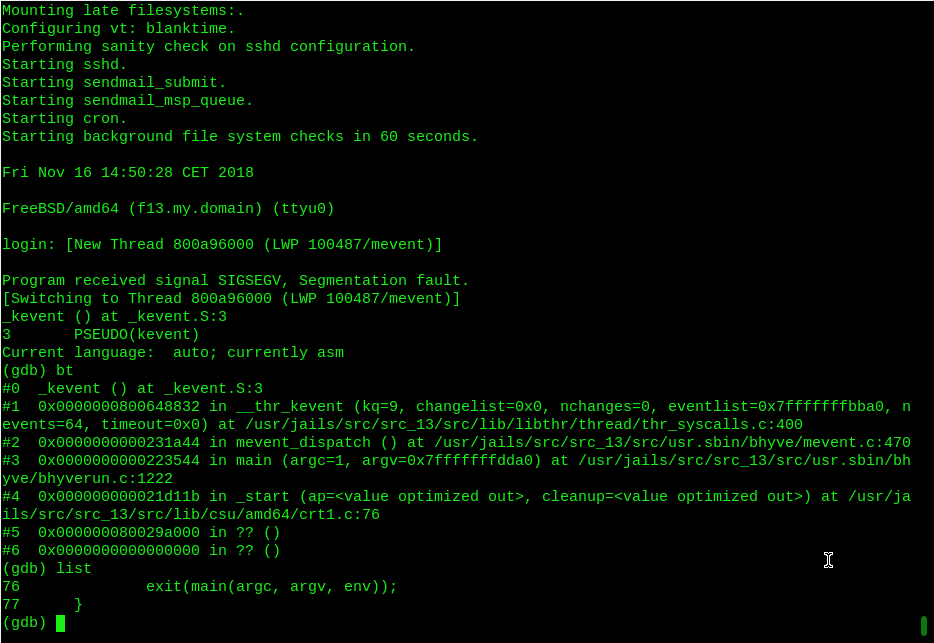
During the operation of bhyve, you may encounter problems inherent in any other software that man created. Namely - the bhyve process may die suddenly. This is an unpleasant situation and should not exist in an ideal world. You can bring the perfect world closer by correcting this error if you are a kernel hacker. But if you are not so, you can still help the project by filling out the maximum informative error report. With this problem we can be helped by the opportunity CBSD to run bhyve throuch gdb (GNU debuger) or lldb (LLVM) debuger. Also, this feature will be useful to bhyve developers or in any other research projects..
As an example, we give the situation with this crash NetBSD guest, when you turn on the xhci driver. In this case, we launched a NetBSD virtual machine with the lldb option and got a backtrace that was sent to tech-kern maillist of NetBSD and bugs.freebsd.org
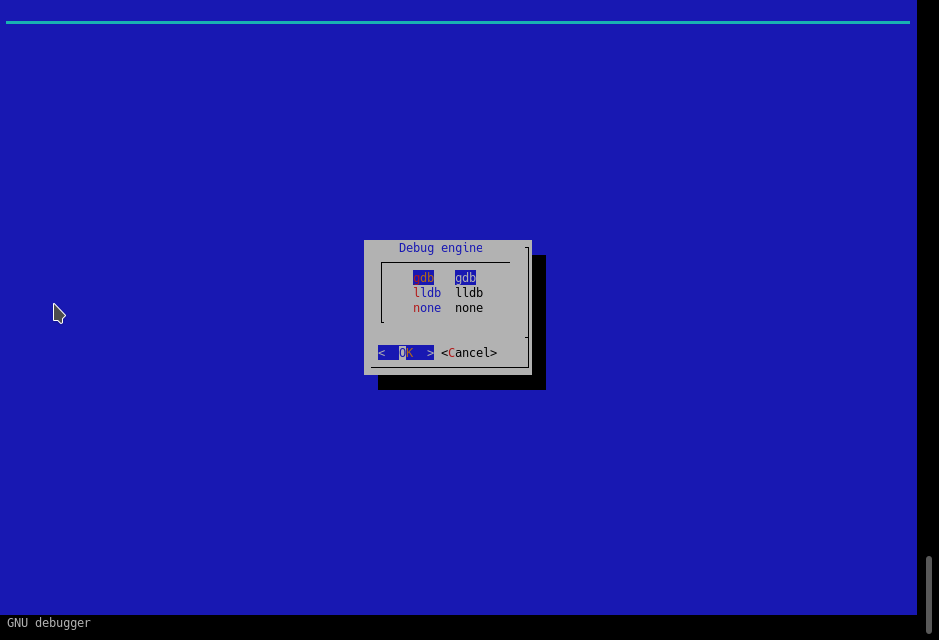
To launch bhyve through debugger, use the menu debug_engine in 'cbsd bconfig' and 'cbsd bconstruct-tui' dialogs.
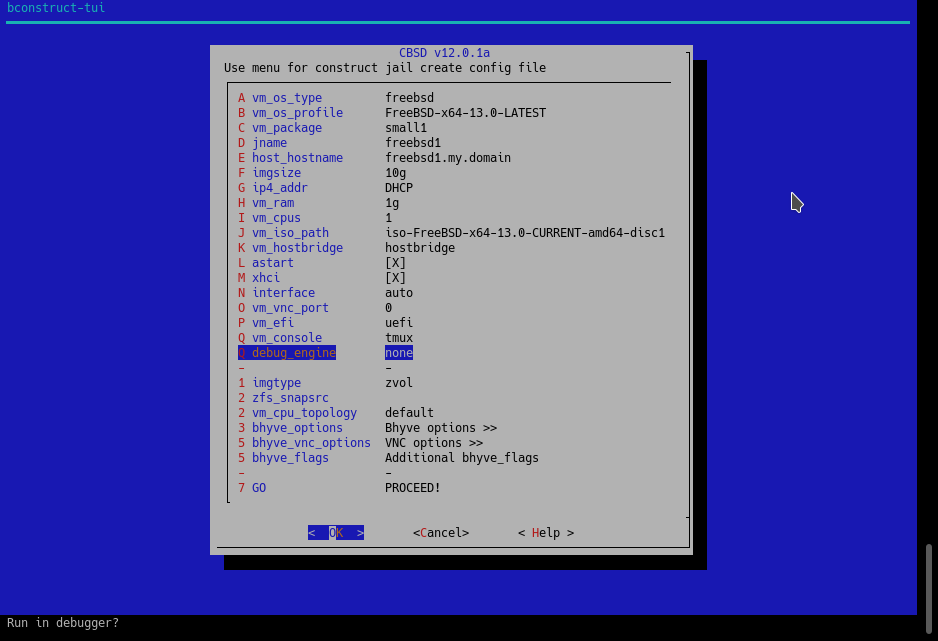
You can choose your favorite debugger available in FreeBSD: gdb or lldb
The difference in launching through debug_engine from the usual one is that CBSD as a prefix for running bhyve with all the arguments, substituting your chosen debugger. This launch will not take place in the background so that you can see and interact with the debugger interactively.
During the startup process, you will end up in gdb/lldb and you need to execute the 'run' command to start the virtual machine.
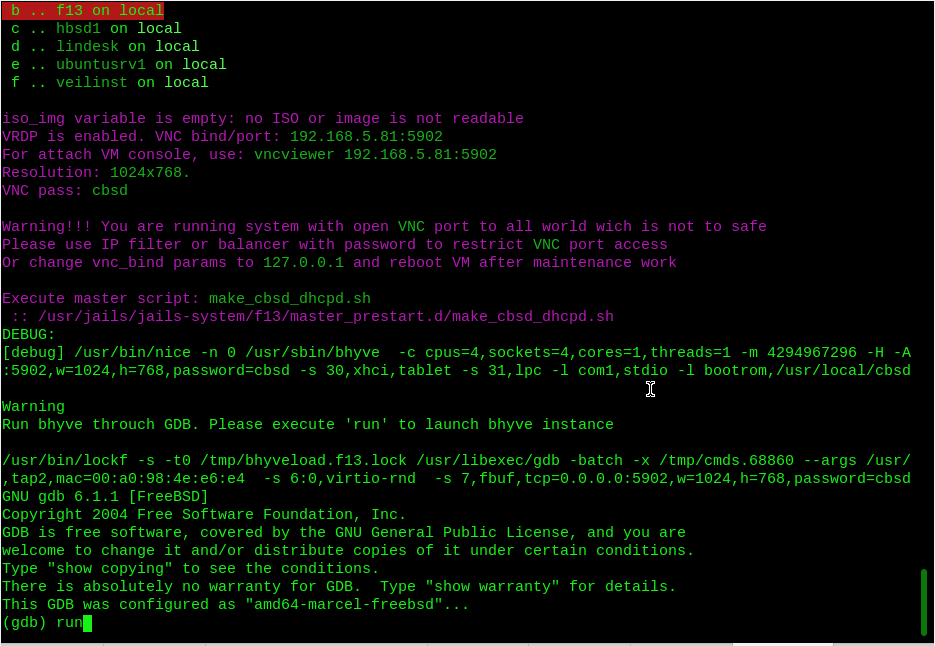
If the bhyve process dies, you will have a debugger console where you can at least get a backtrace and attach it to your PR/message, which can help a lot in solving the problem.